Sunday

Installing NGINX and PHP-FPM - Setup for NGINX

You've gotten your system ready to install PHP-FPM.
Now this is the most complicated and quite possibly the hardest piece to the setup.
Here is the overwhelming and complicated command set that you will need to enter in order to get NGINX and PHP-FPM installed on your Debian System.
apt-get -t squeeze-backports install nginx-extras; apt-get install php5 php5-fpm php5-common php5-curl php5-dev php5-gd php5-imagick php5-mcrypt php5-memcache php5-mysql php5-pspell php5-snmp php5-sqlite php5-xmlrpc php5-xsl php-pear libssh2-php php5-cli
At this time I create a system user for NGINX.
adduser --system --no-create-home nginx
This command simply creates a system user with no home directory. We will use this User later in our setup.
WOW, that was tough! I know you may be tired, so this is a good time to take a break.

Well now that we have installing NGINX out of the way, we can proceed to setting up NGINX and PHP-FPM to work on your system.
If you are coming from the world of Apache, NGINX will look like Chinese to you. Though you will see that there are some familiar directives and you will see some things that you may recognize. Though I would implore you to go to the NGINX Wiki and read up on how things are done in NGINX. Essentially, if it does not work right it is because you did it wrong. Now that might sound harsh, but it is the truth. NGINX is stupid simple, and one of the things that I had the hardest time with was realizing that there was no need for complicated nonsense in my setup. NGINX allows you to change the outlook on your web application from complication to simplicity. So like Steve Jobs used to always say, "It just Works."

In NGINX everything that you will need to mess with is in the directory /etc/nginx. So for this part of the guide, please go to the directory /etc/nginx and it is here that we will begin changing the configuration files.

There are several default files that you will have to concern yourself with, and then a few others that I created so that I can use in my deployment of Virtual Hosts.
Default Files
  • nginx.conf
  • fastcgi_params
Files that I made to simplify my life
  • security
  • mail.conf
Before we go crazy and start deleting files and changing functions I recommend that we make a backup for the core files. Here is how you can do this simply and fast.
tar -czf ~/NGINX_Config.tar.gz nginx.conf fastcgi_params

Here is the nginx.conf that I have setup for my System. You can modify this to fit the needs of your particular environment, but generally speaking this should be good enough for most production systems.

Please Take Notice: In the nginx.conf file shown below, I have 2 ‘includes’ in the # Virtual Host Configs area. These ‘includes’ are so I can have a separate config file directory and separate virtual host file directory. Now these ‘includes’are not necessary, but make life so much simpler. However if you are set in your old ways and would like to have a very long single configuration file similar to the Apache httpd.conf, NGINX can accommodate that too. Essentially everything would be added to the nginx.conf file. However, I highly recommend you start out with good practices and use the applications resources as they have been designed.
user nginx www-data; worker_processes 4; pid /var/run/nginx.pid; events { worker_connections 768; # multi_accept on; } http { # Basic Settings sendfile on; tcp_nopush on; tcp_nodelay on; keepalive_timeout 65; types_hash_max_size 2048; # server_tokens off; # server_names_hash_bucket_size 64; # server_name_in_redirect off; include /etc/nginx/mime.types; default_type application/octet-stream; # Logging Settings log_format gzip '$remote_addr - $remote_user [$time_local] ' '"$request" $status $bytes_sent ' '"$http_referer" "$http_user_agent" "$gzip_ratio"'; access_log /var/log/nginx/access.log gzip buffer=32k; error_log /var/log/nginx/error.log notice; # Gzip Settings gzip on; gzip_disable "msie6"; gzip_vary on; gzip_proxied any; gzip_comp_level 6; gzip_buffers 16 8k; gzip_http_version 1.1; gzip_types text/plain text/css application/json application/x-javascript text/xml application/xml application/xml+rss text/javascript; # Virtual Host Configs include /etc/nginx/conf.d/*.conf; include /etc/nginx/sites-enabled/*; }

Here are the fastcgi_params
fastcgi_param QUERY_STRING $query_string; fastcgi_param REQUEST_METHOD $request_method; fastcgi_param CONTENT_TYPE $content_type; fastcgi_param CONTENT_LENGTH $content_length; fastcgi_param SCRIPT_NAME $fastcgi_script_name; fastcgi_param REQUEST_URI $request_uri; fastcgi_param DOCUMENT_URI $document_uri; fastcgi_param DOCUMENT_ROOT $document_root; fastcgi_param SERVER_PROTOCOL $server_protocol; fastcgi_param SCRIPT_FILENAME $document_root$fastcgi_script_name; fastcgi_param PATH_INFO $fastcgi_script_name; fastcgi_param GATEWAY_INTERFACE CGI/1.1; fastcgi_param SERVER_SOFTWARE nginx/$nginx_version; fastcgi_param REMOTE_ADDR $remote_addr; fastcgi_param REMOTE_PORT $remote_port; fastcgi_param SERVER_ADDR $server_addr; fastcgi_param SERVER_PORT $server_port; fastcgi_param SERVER_NAME $server_name; # PHP only, required if PHP was built with --enable-force-cgi-redirect fastcgi_param REDIRECT_STATUS 200;


Nginx.conf and fastcgi_params are the two basic files that you have to work with in order to setup NGINX. Now here are the custom configs that I added to simplify my life.
First I setup a security file, to fend off some basic annoyances. This is the security file:
## Only requests to our Host are allowed # if ($host !~ ^($server_name)$ ) { # return 444; # } ## Only allow these request methods ## ## Do not accept DELETE, SEARCH and other methods ## if ($request_method !~ ^(GET|HEAD|POST)$ ) { return 444; } ## Deny certain Referers ### if ( $http_referer ~* (babes|forsale|girl|jewelry|love|nudit|organic|poker|porn|sex|teen) ) { return 404; return 403; }

Next I setup a file for the mail directives that are normally in the nginx.conf file. I place these commented out lines in a mail.conf file in the /etc/nginx/conf.d/ folder and I leave the lines all commented out. I do this so that I could use it in the future if I ever choose to, though I am fairly sure that I wont. Essentially this part is optional and not necessary. The file created is mail.conf and it should be placed in the /etc/nginx/conf.d/ directory.
#mail { # # See sample authentication script at: # # http://wiki.nginx.org/ImapAuthenticateWithApachePhpScript # # # auth_http localhost/auth.php; # # pop3_capabilities "TOP" "USER"; # # imap_capabilities "IMAP4rev1" "UIDPLUS"; # # server { # listen localhost:110; # protocol pop3; # proxy on; # } # # server { # listen localhost:143; # protocol imap; # proxy on; # } #}


Now that you have the basic NGINX configuration out of the way, it is time to setup some Virtual Hosts. In Debian there are two subdirectories located under the /etc/nginx/ directory. These are sites-available and sites-enabled. The functions for these directories are fairly straightforward. One is the place you house your Virtual Hosts, and the other is where the active Virtual Hosts live. Essentially if you are familiar with Apache, this has the same functionality. You have a Virtual Host Config file in the available directory and you either copy or symlink the files from one place to the other. To symlink a Virtual Host config file from one directory to another, enter this command.
ln -s /etc/nginx/sites-available/THE.VIRTUAL.HOST.FILENAME /etc/nginx/sites-enabled/THE.VIRTUAL.HOST.FILENAME

As you build your Virtual Hosts I recommend that you do this from within the directory /etc/nginx/sites-available.  While following the instructions for this portion of the guide, please navigate to the /etc/nginx/sites-available directory.
Here is the Virtual Host file that I have setup for instances using PHP.
Replace DOMAINNAME with the "DOMAIN NAME" you want to create a Virtual Host for
server { server_name www.DOMAINNAME; rewrite ^(.*) http://DOMAINNAME$1 permanent; } server { listen 80; server_name DOMAINNAME; root /var/www/DOMAINNAME/htdocs; index index.php; include /etc/nginx/security; # Logging -- access_log /var/log/nginx/DOMAINNAME.access.log; error_log /var/log/nginx/DOMAINNAME.error.log notice; # serve static files directly location ~* ^.+.(jpg|jpeg|gif|css|png|js|ico|html|xml|txt)$ { access_log off; expires max; } location ~ \.php$ { try_files $uri =404; fastcgi_pass unix:/var/run/php5-fpm/DOMAINNAME.socket; fastcgi_index index.php; include /etc/nginx/fastcgi_params; } }
Please review the PHP section of this virtual host template. This is the first reference to using UNIX file sockets for processing PHP.

If you need and or want a Virtual Host that is not using PHP, simply remove the PHP portion of the previous configuration file. That would look like this.
server { server_name www.DOMAINNAME; rewrite ^(.*) http://DOMAINNAME$1 permanent; } server { listen 80; server_name DOMAINNAME; root /var/www/DOMAINNAME/htdocs; index index.php; include /etc/nginx/security; # Logging -- access_log /var/log/nginx/DOMAINNAME.access.log; error_log /var/log/nginx/DOMAINNAME.error.log notice; # serve static files directly location ~* ^.+.(jpg|jpeg|gif|css|png|js|ico|html|xml|txt)$ { access_log off; expires max; } }
In these virtual host files you will see that there is a line for root /var/www/DOMAINNAME/htdocs. This line is the location where NGINX will look for the files that you are attempting to serve. You should change this so that the Virtual Host File is pointing to the location where you have placed your files.

Once you are finished with the NGINX Aspect of this deployment, meaning you have replaced your files with the ones I have shown here and then created your virtual hosts, you are now ready to configure PHP-FPM.

Here you are going to simply add some POOL information to the PHP-FPM setup that you have already done. Unknowingly when you entered the command to install PHP-FPM, the system setup a default configuration for PHP-FPM. So most of the heavy lifting has been done for you.
You may have to do one thing and that is to create a directory where you want your Sockets to live while they are alive. I placed them here: /var/run/php5-fpm/ You can use this command to create the directory.

mkdir -p /var/run/php5-fpm/
This directory may already exists by simply installing PHP-FPM. This is the place where your file sockets will exist when online. Once you are sure that this directory exists there is nothing further you will need to do with this directory. Sockets will automatically spawn here provided you are using the virtualhost setup and PHP-FPM pool template provided.


To complete the setup move to the directory /etc/php5/fpm/pool.d/. It is here that you will setup the different UNIX Sockets that PHP-FPM will function on. 

Please Note:  In order for your system to function properly you will need to create a new POOL for every Virtual Host that you had setup.
The pool files should follow this naming convention: YOURDOMAIN.conf
Here is a template for the pool files.
[DOMAINNAME] listen = /var/run/php5-fpm/DOMAINNAME.socket listen.backlog = -1 ; Unix user/group of processes user = (THE USERNAME OF THE USER THAT OWNS THE SITE FILES) group = www-data ; Choose how the process manager will control the number of child processes. pm = dynamic pm.max_children = 75 pm.start_servers = 10 pm.min_spare_servers = 5 pm.max_spare_servers = 20 pm.max_requests = 500 ; Pass environment variables env[HOSTNAME] = $HOSTNAME env[PATH] = /usr/local/bin:/usr/bin:/bin env[TMP] = /tmp env[TMPDIR] = /tmp env[TEMP] = /tmp ; host-specific php ini settings here ; php_admin_value[open_basedir] = /var/www/DOMAINNAME/htdocs:/tmp
Please remember to replace all instances of "DOMAINNAME" with then name of your domain.


Now that you have gone through the whole guide and you have installed and created all of the files needed for your installation, you will need to restart NGINX and PHP-FPM. After you restart both services it will be up and working. You will have NGINX running Fast-CGI with PHP-FPM. Your Installation will be running on all separate UNIX Sockets with separate owners per socket ensuring a more secure environment. Furthermore, your NGINX Setup will be fast and furious. In my own speed tests I’ve conducted, my site running on NGINX vs. My Site Running on Apache, my NGINX site was over 3x faster in both response and action. All while on a small 256MB Virtual Server, which in my opinion is ridiculously awesome!
Here is a quick Command to restart Both NGINX and PHP-FPM

service nginx restart; service php5-fpm restart

If there was no error that popped up, you can now go to your domain that you have setup and you will be running good old NGINX and PHP-FPM.
Enjoy!


Another Note..
Just to reiterate, this works and needs nothing else, you can change things to better suit your environment though there is almost nothing else that you need to get the services up and running. Secondly, I have not conveniently left something out of this document. At more than 2500 words, I think I gave too much insight, though I hope this helps.
I would also like to say Thank you to my fellow Rackers, in particular Patrick Cantu, without our bickering about if this could be done, I would have never thought about doing this nor would I have ever done it. I would also like to say thank you to the people over at DotDeb. You people are what make the Open Source Community a great place to develop. You can read more about DotDeb and their repositories here.

curtsy: rackspace

Installing NGINX and PHP-FPM - Setup for NGINX

You've gotten your system ready to install PHP-FPM.
Now this is the most complicated and quite possibly the hardest piece to the setup.
Here is the overwhelming and complicated command set that you will need to enter in order to get NGINX and PHP-FPM installed on your Debian System.
apt-get -t squeeze-backports install nginx-extras; apt-get install php5 php5-fpm php5-common php5-curl php5-dev php5-gd php5-imagick php5-mcrypt php5-memcache php5-mysql php5-pspell php5-snmp php5-sqlite php5-xmlrpc php5-xsl php-pear libssh2-php php5-cli
At this time I create a system user for NGINX.
adduser --system --no-create-home nginx
This command simply creates a system user with no home directory. We will use this User later in our setup.
WOW, that was tough! I know you may be tired, so this is a good time to take a break.

Nginx Support Enables Massive Web Application Scaling

Your web applications need to scale, especially during demanding traffic events. Nginx is a high-performance web server and reverse proxy that can help you do that. Today, we are extending ourManaged Cloud Fanatical Support to include the installation, troubleshooting, patching and performance tuning of Nginx.
Specifics of what is supported can be found in the Knowledge Center article about Cloud Servers with Managed Service Level – Spheres of Support.
At its heart, Nginx is a web server, a very fast web server! The key to Nginx’s speed is its asynchronous or event driven model for serving out objects where each request and response is seen as an individual event that is then forgotten until the next event. By comparison, Apache uses a threaded model where each request ties up resources until the full request is made, responded to and the connection is terminated.
There are three common use-cases where Nginx really stands out, and your Managed Cloud Support Team can help implement for you:
  1. As a reverse proxy / cache in front of Apache
  2. As a reverse proxy /cache in front of an Application Server or Framework
  3. As a replacement for Apache and mod_php

Nginx as a Reverse Proxy / Cache In Front of Apache

Probably the simplest use-case to implement is using Nginx in front of Apache to serve and cache static content while passing dynamic content like PHP back to Apache to serve. Used in this way, you can scale your application right away while changing very little, if any of your code.
Configured this way, you can scale your servers vertically, serving many times more customers by implementing caching and serving static objects directly out of Nginx. If you use any of the most common CMS systems like WordPress, Drupal or Joomla, then you’re probably a good candidate to scale your environment this way.

As a Reverse Proxy /Cache in Front of an Application Server or Framework

Application servers and frameworks like Ruby on Rails, Django, IIS and others handle complex logic and query requests well but generally don’t serve http requests as effectively as Nginx or provide as robust of a security posture as well as a web server.
Nginx can be used in front of those applications to handle the initial requests, cache static content, provide additional security and load balance between multiple application servers allowing you to easily scale out your application.

Nginx as a Replacement for Apache and mod_php

Nginx does not directly replace Apache, so the title of this use-case is a bit misleading. To fully replace Apache with mod_php, an additional application called PHP-FPM is also required to handle the PHP processing. The good news is that it can be easily installed from any of the major distribution repository systems, and our system administrators can help configure PHP-FPM for your environment.
As a replacement for Apache, Nginx can handle all of Apache’s major functions including redirects, authentication, aliases, and server side includes, as well as provides some new capabilities like in-line substitution of page content, streaming video and integration directly with mail servers.

Next Steps

If you’re interested in finding out how Nginx can help you scale your environment, just reach out to your Managed Cloud Support team by ticket, phone or chat and we’ll help you design and implement an Nginx environment customized for your needs.
curtsy: rackspace

Saturday

Step By Step Guide To Install Memcache On Linux


This post is more like a note to me, so that in future I can look up for steps involved in installing memcache on Linux servers like Centos or RHEL.
Those of you who follow me on twitter, will know that me and my friends spends hours trying to install memcache on one of our web server. Normally this is a five minute job, but unfortunately for us those tricks did not work out.
So if you have tried YUM and APT-GET and still could not install the memcache then read on, to find the alternate( read manual, without magic ) way of doing it.
When we talk about Memcache their two things that needs to be installed
  1. Memcache Daemon know as memcached, and
  2. Memcache client for your programing language, in this case PHP.

Installing Memcache Daemon

Note these steps has been taken fromhttp://in2.php.net/manual/en/memcache.installation.php

Steps to install Libevent(memcached dependency)

  1. First we need to check if libevent is installed or not?
    1. type whereis libevent on shell.
  2. If you don’t find it, then we need to download and install it.  Type following sequence of commands on your shell
    1. wget http://www.monkey.org/~provos/libevent-1.4.8-stable.tar.gz
    2. tar xfz libevent-1.4.8-stable.tar.gz
    3. cd libevent-1.4.8-stable
    4. ./configure
    5. make
    6. sudo make install
  3. Finally we need to create a symlink to libevent
    1. type  sudo ln -s /usr/local/lib/libevent-1.4.so.2 /usr/lib on shell.
Now that we have installed the dependencies, we will install the memcahced.

Steps to install Memcached

  1. Download and install, for that type following sequence of commands on your shell
    1. wget http://danga.com/memcached/dist/memcached-1.2.6.tar.gz
    2. tar xfz memcached-1.2.6.tar.gz
    3. cd memcached-1.2.6
    4. ./configure
    5. make
    6. sudo make install
  2. Run Memcached as a daemon (d = daemon, m = memory, u = user, l = IP to listen to, p = port)
    1. type memcached -d -m 1024 -u root -l 127.0.0.1 -p 11211 on shell
Note: versions numbers mentioned here might be outdated, so do check for updated package to download.
Now we have installed and started the Memcache daemon, it’s time to install PHP client.

Installing Memcache Extension for PHP

Some of the steps mentioned below are taken fromhttp://www.sitepoint.com/article/getting-started-with-pear/2/
  1. Let’s determine the PHP version installed and also make sure it is in system path.
    1. type php -v on you shell, it should show something like PHP 5.2.6 (cli) (built: Nov  4 2008 09:25:57)
    2. type whereis php to get the path where PHP is installed in your system.
    3. In your accounts home directory create/edit ‘.profile’ file and add ‘export PATH=$PATH:/usr/local/bin‘ where ‘/usr/local/bin‘ is the folder where php executable is installed.
  2. Install PEAR, type following sequence of commands on your shell
    1. wget http://pear.php.net/go-pear -O go-pear.php
    2. php go-pear.php and follow the installation instructions
    3. ls -l ~/.pearrc
    4. edit the ‘.profile‘ (again) and add exportPATH=/home/yourname/pear/bin:$PATH
  3. Finally Install Memcache
    1. type pecl install memcache on your shell, it will install memcahce extension for PHP.
  4. Edit php.ini to add ‘extension=memcache.so‘, to find the exact php.ini file used by your system
    1. php -i | grep ‘php.ini’
  5. Restart apache, and you are done  type one of the commands below to do that
    1. /etc/init.d/apache  restart , or
    2. service httpd restart
I hope this helps and save some time for you, I have a limited knowledge of Linux, so if some one can improve in the steps, please do so in the comments.

PrestaShop vs Magento which is better for e-commerce


The most widespread shopping platform. There is no need to say anything more. You all know this shopping cart. It’s Magento! 
One of the most user-friendly and easy to operate shopping carts. It’s PrestaShop! So, let’s get ready to rumble!!!
Who is where
It is an open source and free to download shopping cart. Magento community is extremely big and includes around 375 000 of people. More than 100 000 of Internet shops are based on Magento. The platform is available in 60 languages and this number continues to grow! Incredibly, but it seems that at the moment Magento is one of the best options and it definitely wins the first round.

Don’t forget that PrestaShop is also an open source platform. And it is available in more than 40 languages. At the moment more than 50 000 of Web stores are using this platform. This number is constantly growing from year to year with amazing speed. And what is even more important all users agree that PrestaShop has far more user-friendly and flexible interface. If we take into consideration that PrestaShop is almost six years younger than Magento you will understand that it is incredible result.

Which are best part of them
  • Both platforms have a wide selection of product management tools that include: product, order history and customers management systems.
  • Both carts support a great number of payment gateways that include: PayPal, Google Checkout, Authorized.Net and other.
  • A variety of available PrestaShop modules makes it very simple in development and administration. However, some of these modules are quite expensive.
  • PrestaShop is very simple in installation, but the number of basic features is considerably less when compare it to Magento.
  • PrestaShop software is much smaller in MBs and it has lower system requirements. However, Magento offers better out-of-the-box feature set.
  • Magento is more useful for big scale Internet stores while PrestaShop will better suit small and middle sized companies.
  • Magento offers better SEO features. However, PrestaShop has emphasized its search capabilities since its launch.
  • Magento definitely has bigger user community. While PrestaShop provides customers with an official support. Users also share their experience and advices on the PrestaShop Forum.
  • Magento store needs a very good hosting environment. It means that you will have to pay extra money for a good server.
Verdict
PrestaShop and Magento showed that they have both advantages and disadvantages. Presta shopping cart is much easier in installation and operating. It will perfectly handle with your Internet store if it is small or middle sized. However, the number of product items is almost unlimited. Which means that if you have enough skills and experience you can also manage a big Web store based on this platform. PrestaShop can become a good solution for a beginner to start-up his business. Nevertheless, experienced user will also find PrestaShop shopping cart very useful. At the same time Magento can be a very good solution for a big Internet store with a very wide range of items. New updates that are available for Magento can help you make your business successful.

Users decision
Both platforms are standing on their feet with their heads proudly raised. It is up to you to decide which of them is better for your business requirements.

Some more technical comparison

There seems to be growing anger with magento as the community is slowly and painfully discovering that varien, the company behind it isn't so much interested in championing a reliable open source product, than to create a community that would require extensive commercial support.
In the 2 days that I've been researching magento, the amount of negative feedbacks that I've heard and the code quality is more than enough to steer me away. After having a look through the source, I believe the intended basic architectural principles were decent, but the execution is wrong. Many PHP programmers see OOP and call it good software. I'm reasonably well versed with the Zend Framework and am generally reluctant to refer to any code as bloat, but in this case I have few other choice of word. Magento seems to uses some Zend libraries, but the relationship doesn't warrant good quality code. Don't take my word for it, here's some evidence. I decided to follow a request to see what happens during a call to one of the action controllers, so I tried to trace calls made within the Mage_Adminhtml_Customer_GroupController::indexAction method, starting with a call to $this->loadLayout(). Pretty self explanatory right, we're loading a layout. Lets see where it takes us. The following illustrates a single thread in that one call, where each line represents a call to a new method from the preceding method:
    Mage_Adminhtml_Customer_GroupController::indexAction
        Mage_Adminhtml_Controller_Action::loadLayout
            Mage_Core_Controller_Varien_Action::loadLayout
                Mage_Core_Controller_Varien_Action::addActionLayoutHandles
                    Mage_Core_Controller_Varien_Action::getLayout
                        Mage::getSingleton                               
                            Mage::getModel
                                Mage::getConfig
                                    Mage::registry
I repeat, we're following a single thread from within one call to $this->loadLayout(). In real time each call to a method would likely initiate multiple threads as they fork and each action would likely have multiple method calls. Is anyone still surprised as to why magento would be so slow? Just because it's OOP, doesn't necessarily mean this is good. This code looks like something meant to be compiled (therefore reduced), but PHP is (for the most part) a "just-in-time" technology, you should refrain from doing this sort of things.

Tuesday

How to: Dealer Locator extension for Magento


In this article I will try to explain how to build a “Dealer Locator” extension for Magento. This article is all about extension concepts, structure and planing and not the code itself.
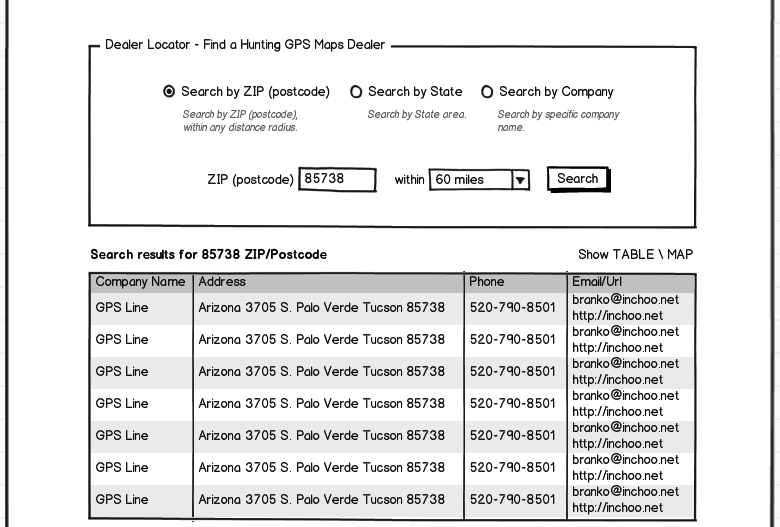
First we will start with scoping the feature. What functionality should it have? In our example, let’s imagine a client that wants a dealer locator to have “Search by nearest dealer based on ZIP/Postcode”, “Search by State”, “Search by dealer company name”. Search results should be displayed primarily on Google Map, plus it would be nice to have a table listing for those disliking the map visual style.
If we extend this a bit further, we soon come to realisation that “dealers” themselves should be a customers in our Magento system. Justification for this lies in a fact that dealers should be able to do a regular purchases on our Magento store like any other customer just with special prices applied to products. Since customer in Magento has to have a customer group assigned to it, and products special pricing can be applied for each customer group. Thus all we need to do in order to “convert” dealers to customers is to create a customer group “Dealer” or even use “Wholesale” for these types of customers. Then on each product set a special price for that customer group, that is if the dealers will have special prices.
Now, since dealers are just customers in our system then customer address(es) can be used for dealer locations. And this realization is the basis of our “Dealer locator” extension. Now that we have the general picture set, lets make a wireframe of the “Dealer locator” functionality.

Once the wireframe is approved by the client we can start with the preparations for development. Now, if we look back at the original requirement: “Search by nearest dealer based on ZIP/Postcode”, “Search by State”, “Search by dealer company name” we can easily see that “Search by nearest dealer based on ZIP/Postcode” part will be the most challenging one. “Search by State”, “Search by dealer company name” are straightforward as this is the direct property of each customer address. “Search by nearest dealer based on ZIP/Postcode” is something we will need to use certain calculations that involve geocode data.
General approach we will take towards “Search by nearest dealer based on ZIP/Postcode”:
- We will create an install script, for example app/code/community/Inchoo/Dealerlocator/sql/inchoo_dealerlocator_setup/install-1.0.0.0.php that adds two additional attributes to the customer address entity: inchoo_geo_latitude, inchoo_geo_longitude
- We will observe “customer_address_save_before” event and trigger a Inchoo_Dealerlocator_Model_Observer->injectLatLongIntoAddress() method once the event is fired. Note, injectLatLongIntoAddress is freely taken/chosen method name
- Within injectLatLongIntoAddress() we will execute a code that “contacts” the Google Maps API maps.google.com/maps/geo sending it the customer address information (namely street, postcode, city, country) then parses the response into the inchoo_geo_latitude, inchoo_geo_longitude properties of an address. Since we are observing customer_address_save_before event this data is then simply saved to customer address
- Once we have geo latitude and longitude data saved on each address we can now query the address collection for this information
- We still lack one important ingredient in this “Search by nearest dealer based on ZIP/Postcode” request, thats the “nearest”. We need to come up with a way to calculate the distance between two geo coordinates. There is a nice MySQL code snippet for this http://www.codecodex.com/wiki/Calculate_Distance_Between_Two_Points_on_a_Globe#MySQL. All we need to do is to transform to Magento collection :)
- Finally, the same way we did a geo mapping in the “customer_address_save_before” event for each address save, we will do a live geo mapping of the provided “referencing ZIP/Postcode”, the one that is provided on the frontend input text field. This way we have two geo location coordinates between which we calculate the distance: the referencing ZIP/Postcode geo coordinates vs. specific customer address geo coordinates
- Now we should have all pre-requirements for building the “Search by nearest dealer based on ZIP/Postcode”, we have latitude and longitude, we have distance.
I’m gonna be kind enough to provide you with my example of code for injectLatLongIntoAddress():


1
2
3
4
5
6
7
8
9
10
11
12
13
14
15
16
17
18
19
20
21
22
23
24
25
26
$coordinates = array();$saveCoordinatesToAddress = true;$lineAddress = $address->getStreet1(). ', '.$address->getPostcode().' '.$address->getCity().', '.$address->getCountry();$client = new Zend_Http_Client();$client->setUri('http://'.self::GOOGLE_MAPS_HOST.'/maps/geo');$client->setMethod(Zend_Http_Client::GET);$client->setParameterGet('output', 'json');$client->setParameterGet('key', $this->getGoogleMapsApiKey());$client->setParameterGet('q', $lineAddress);$response = $client->request();if ($response->isSuccessful() && $response->getStatus() == 200) {    $_response = json_decode($response->getBody());    $_coordinates = @$_response->Placemark[0]->Point->coordinates;    if (is_array($_coordinates) && count($_coordinates) >= 2) {        $coordinates = array_slice($_coordinates, 0, 2);        if ($saveCoordinatesToAddress) {            try {                $address->setInchooGeoLongitude($coordinates[0]);                $address->setInchooGeoLatitude($coordinates[1]);                $address->save();            } catch (Exception $e) {                Mage::logException($e);            }        }    }}
Please note the $saveCoordinatesToAddress variable. If we pack the code above into a separate method we can reuse it for live geo mapping of the provided “referencing ZIP/Postcode” as well.
And here is the Magento customer collection object with included addresses and “distance” value calculation:


1
2
3
4
5
6
7
8
9
10
11
12
13
14
15
16
17
18
19
20
21
22
23
public function getNearbyDealersLocations($radius, $centerLat, $centerLng)
{
    $customerGroup = Mage::getModel('customer/group');
    $customerGroup->load('Dealer', 'customer_group_code');
    if (!$customerGroup->getId()) {
        throw new Exception($this->__('Unable to load the customer group.'));
    }
    $collection = Mage::getResourceModel('customer/customer_collection')
                        ->addNameToSelect()
                        ->addAttributeToFilter('group_id', array('eq'=>$customerGroup->getId()))
                        ->joinAttribute('billing_company', 'customer_address/company', 'default_billing', null, 'left')
                        ->joinAttribute('inchoo_geo_latitude', 'customer_address/inchoo_geo_latitude', 'default_billing', null, 'left')
                        ->joinAttribute('inchoo_geo_longitude', 'customer_address/inchoo_geo_longitude', 'default_billing', null, 'left')
                        ->addAttributeToFilter('inchoo_geo_latitude', array('notnull'=>true))
                        ->addAttributeToFilter('inchoo_geo_longitude', array('notnull'=>true))
                        ->addExpressionAttributeToSelect('distance', sprintf("(3959 * acos(cos(radians('%s')) * cos(radians(at_inchoo_geo_latitude.value)) * cos(radians(at_inchoo_geo_longitude.value) - radians('%s')) + sin(radians('%s')) * sin( radians(at_inchoo_geo_latitude.value))))",   $centerLat, $centerLng, $centerLat, $radius), array('entity_id'));
    if ($radius !== 0) {
        $collection->getSelect()->having('distance < ?', $radius);
    }
    $collection->getSelect()->order('distance ' . Varien_Db_Select::SQL_ASC);
    //echo (string)$collection->getSelect(); exit;
    return $collection;
}


With the above in place you all that remains is to output the search results into the table or into the Google Map. There are plenty of example codes out there that show how to embed google maps with marker so I’m not going to cover this here. As mentioned at the beginning, the purpose of article is not to give a code ready solution but to give you an overview of the process that latter can then be given to developer so he can develop the feature.

courtsy: Branko Ajzele

Wednesday

Magento primary things


Q 1. What is Magento?

Ans. Magento is a feature-rich eCommerce platform built on open-source technology that provides online merchants with unprecedented flexibility and control over the look, content and functionality of their eCommerce store. Magentos intuitive administration interface features powerful marketing, search engine optimization and catalog-management tools to give merchants the power to create sites that are tailored to their unique business needs. Designed to be completely scalable and backed by Variens support network, Magento offers companies the ultimate eCommerce solution.


Q 2. What is the difference between Mage::getSingletone() andMage::getModel() in Magento

Ans. Mage::getSingletone() always finds for an existing object if not then create that a newobject but Mage::getModel() always creates a new object.


Q 3. Why Magento use EAV database model ?

Ans. In EAV database model, data are stored in different smaller tables rather than storing in asingle table.product name is stored in catalog_product_entity_varchar tableproduct id is stored in catalog_product_entity_int tableproduct price is stored in catalog_product_entity_decimal tableMagento Use EAV database model for easy upgrade and development as this model givesmore flexibility to play with data and attributes.


Q 4. How to upgrade to the latest version using Magento Connect?

Ans. Upgrading Magento to the latest version is a fairly simple task. Copy and Paste this key magento-core/Mage_All_Latest VIA Magento Connect where it states Paste extension key to install:. This will upgrade Magento to the newest version.


Q 5. Explain about the Modules of Magento?

Ans. Magento supports installation of modules through a web-based interface accessible through the administration area of a Magento installation. Modules are hosted on the Magento eCommerce website as a PEAR server. Any community member can upload a module through the website and is made available once confirmed by a member of the Magento team. Modules are installed by entering a module key, available on the module page, into the web based interface.

There are three categories of modules hosted on Magento Connect:

Core Modules

Community Modules

Commercial Modules

Core and Community modules can be installed via the administration area. Commercial module pages provide price information and a link to an external website.


Q 6. What technology used by Magento?

Ans. Magento uses PHP as a web server scripting language and the MySQL Database. The data model is based on the Entity-attribute-value model that stores data objects in tree structures, thus allowing a change to a data structure without changing the database definition.


Q 7. What is MVC structure in Magento?

Ans. The Model-View-Controller (MVC) architecture traces its

origins back to the Smalltalk Programming language and Xerox

Parc. Since then, there have been many systems that describe

their architecture as MVC. Each system is slightly

different, but all have the goal of separating data access,

business logic, and user-interface code from one another.


Q 8. What is benefit of namespace (package) in magento?

Ans. We can have more than one module with same name but they should be placed in different namespaces. All magento core modules are contained in mage namespace.

core/Mage/Catalog

and all custom modules are placed in

local/CustomModule


Q 9. How to include CMS block in template file(.phtml)?

Ans. Access block’s content from .phtml template file by :

echo $this->getLayout()->createBlock(‘cms/block’)->setBlockId(‘static_block_id’)->toHTML();


Q 10. How to add an external javascript/css file to Magento?

Ans.

css/yourstyle.css

or

skin_jsjs/ yourfile.js

skin_csscss/yourstyle. css


Q 11. What are handles in magento (layout)?

Ans. Handles are basically used for controlling the structure of the page like which block will be displayed and where. First level child elements of the node are called layout handles. Every page request can have several unique Handles. The handle is called for every page. handle for products belongs to virtual product type, PRODUCT_TYPE_simple is called for product details page of simple product type and PRODUCT_TYPE_virtual is called for the virtual product detail page and customer_logged_in handle is called only if customer is logged in. The muster_index_index handle is created by combining the frontName (muster), Action Controller (index), and Action Controller Action Method (index) into a single string and this handle will be called only when /zag/index/index url is accessed.


Q 12. What is in magento?

Ans. The routers tag allow us to decide frontname for each module. The tag is defined in config.xml file of module. For Namespace_MyModule frontname is moduleurl so the url will be like :

websiteurl.com/moduleurl/controllername/actionname

standard

Namespace_MyModule

moduleurl


Q 13. Which factors affect performance of magento?

Ans.

1. EAV structure of magento database, even for retrieving single entity the query becomes very complex .

2. Magento’s template system involves a lot of recursive rendering

3. Huge XML trees built up for layout configuration, application configuration settings

Q 14. How to improve magento performance?

Ans.

Enabled magento caching

MySQL Query caching

Enable Gzip Compression

Disable any unused modules

Disable the Magento log

Optimise your images

Combine external CSS/JS into one file

Enable Apache KeepAlives: Make sure your Apache configuration has KeepAlives enabled.


Q 15. How to get the Total Price of items currently in the Cart?

helper(‘checkout’)->formatPrice(Mage::getSingleton(‘checkout/cart’)->getQuote()->getGrandTotal()); ?>


Q 16. How to set different themes for logged in users?

if(Mage::getSingleton(‘customer/session’)->isLoggedIn()):

Mage::getDesign()->setPackageName(‘package_name’)->setTheme(‘themename’);

endif;


Q 17. How to create magento custom module?

Ans. Steps to create custom magento module:

Namespace : Zag

Module Name : Mymodule

1. Create directory Mymodule in app/code/local/Zag

2. Create Block, controllers, etc, Module directories. Create controller, block and module file as required.

3. Create module configuration file (app/code/local/Zag/Mymodule/etc/config.xml).

4. Create xml file (app/etc/modules/Zag_ Mymodule.xml)to enable/disable module and tell magento system from which code pool that module will be taken.


Q 18. How to set different themes for each store?

Ans. Go to : System>Designs

Then, add new design change or edit existing. You can select Store and Custom Design.


Q 19. How to make product’s custom attribute searchable in adavance search?

Ans. Go to : Catalog > Attribues > Manage Attribues

Edit the attribute and select “Yes” for Use in Advanced Search.


Q 20. How to fetch 5 bestsellers products programmatically?

Ans.

Mage::getResourceModel(‘reports/product_collection’)

->addOrderedQty()

->addAttributeToSelect(‘*’)

->setPage(1, 5)

->load();


 21-Explain Magento’s MVC architecture

First of all, what is MVC?

MVC stands for Model-View-Controller. Any application that separates it’s data access, business logicand user interface is called MVC. There can be two types of MVC: convention-based andconfiguration-based. Example, cakePHP is convention-based, i.e. you just need to follow the instructions of the core system to get your module ready in just few lines. Magento is configuration-based, i.e. you need to specify each and every thing to your module’s config file in order to get it work. Magento has Controller (for Routing), Block (for Business Logic), Model (for DB access, sql) and Template file (for Presentation i.e. View).

How Magento’s MVC works:

1. When you enter the URL (something like http://mysite.com/frontname/controller/method/param1/value1/param2/value2), this URL is intercepted by one PHP file called index.php which instantiates Magento application

2. Magento application instantiates Front Controller object

3. Further, front controller instantiates Router objects (specified in module’s config.xml, global tag)

4. Now, Router is responsible to “match” the frontname which is in our URL

5. If “match” is found, it sees controller name and method name in the URL, which is finally called.

6. Now depending on what is written in action name (method name), it is executed. If any models are called in it, the controller method will instantiate that model and call the method in it which is requested.

7. Then the controller action (method) instantiate the Layout object, which calls Block specified for this action (method) name (Each controller action name have block and template file associated with it, which can be found at app/design/frontend or adminhtml/namespace/module/layout/module.xml file, name of layout file (module.xml) can be found in config.xml of that module, in layout updates tag).

8. Template file (.phtml) now calls the corresponding block for any method request. So, if you write $this->methodName in .phtml file, it will check “methodName” in the block file which is associated in module.xml file.

9. Block contains PHP logic. It references Models for any data from DB.

10. If either Block, Template file or Controller need to get/set some data from/to database, they can call Model directly like Mage::getModel(‘modulename/modelname’).

For diagramatic view: click here (courtsey: Alan Storm)


22 =How Magento ORM works?

ORM stands for Object Relational Mapping. It’s a programming technique used to convert different types of data to Objects and vice versa.

In Magento, ORM is shown as Model (based on Zend Framework’s Zend_Db_Adapter), which further breaks down to two types of Models.

- First is the “simple” i.e. Regular Models which is nothing but flat table or our regular table structure.

- Second Model is EAV (Entity Attribute Value), which is quite complicated and expensive to query.

All Magento Models interacting with database are inherited from Mage_Core_Model_Abstract class, which is further inherited from Varien_Object.

Difference between two Models is, Simple Model is inherited fromMage_Core_Model_Resource_Db_Abstract class,

while EAV is inherited from Mage_Eav_Model_Entity_Abstract.

For those who don’t know what EAV is, please read my 3rd answer below.

So, to end up this question,

when you want to get some data in Magento, you call it like this:

Mage::getModel('module/model')->load(1);

where 1 is the primary key id for some Regular/Simple table, while in EAV so many tables are joined to fetch just single row of data.


23. What is EAV in Magento?

EAV, stands for Entity Attribute Value, is a technique which allows you to add unlimited columns to your table virtually. Means, the fields which is represented in “column” way in a regular table, is represented in a “row” (records) way in EAV. In EAV, you have one table which holds all the “attribute” (table field names) data, and other tables which hold the “entity” (id or primary id) and value (value for that id) against each attribute.

In Magento, there is one table to hold attribute values called eav_attribute and 5-6 tables which holds entity and data in fully normalized form,

- eav_entity, eav_entity_int (for holding Integer values),

- eav_entity_varchar (for holding Varchar values),

- eav_entity_datetime (for holding Datetime values),

- eav_entity_decimal (for holding Decimal/float values),

- eav_entity_text (for holding text (mysql Text type) values).

EAV is expensive and should only be used when you are not sure about number of fields in a table which can vary in future. To just get one single record, Magento joins 4-5 tables to get data in EAV. But this doesn’t mean that EAV only has drawbacks. The main advantage of EAV is when you may want to add table field in future, when there are thousands or millions of records already present in your table. In regular table, if you add table field with these amount of data, it will screw up your table, as for each empty row also some bytes will be allocated as per data type you select. While in EAV, adding the table column will not affect the previously saved records (also the extra space will not get allocated!) and all the new records will seamlessly have data in these columns without any problem.


24. Difference between Mage::getSingleton() and Mage::getModel()

The difference between Mage:getSingleton() and Mage::getModel() is that the former one does not create an object if the object for same class is already created, while the later creates new objects every time for the class when it’s called.

Mage::getSingleton() uses the “singleton design pattern” of PHP. If the object is not created, it will create it.

Mage::getSingleton() is mostly used when you want to create an object once, modify it and later fetch from it. Popular example is session, you first create a session object, and then add/remove values from session across different pages, so that it retains your values (e.g. cart values, logged in customer details, etc.) and doesn’t create new session object losing your last changes.

Mage::getModel() is used when you want to have the fresh data from the database. Example is when you want to show records from database.

x

Beyond Spot-Checking: Why LLM Applications Require Specialized Evaluation

  images generated by meta ai Building applications with Large Language Models (LLMs) feels deceptively fast at first. A single engineer can...