Tuesday

Writing Scalable Applications with PHP

The first part of this article, "Real-World PHP Security", appeared in the April 2004 issue of Linux Journal and covered the subject of secure PHP development. This article takes you, the professional PHP developer, one step further, by providing detailed explanations and reliable source code that illustrate the steps to follow in order to develop successful PHP applications.

One day or another, every developer faces a situation in which he/she is responsible for extending the functionality of an existing application or prepare an application for an increase in use and traffic (scaling up). Our goal today is to make this process trivial by learning to develop applications based on a clean, elegant and modular design that is secure, reliable and flexible while keeping it all simple.

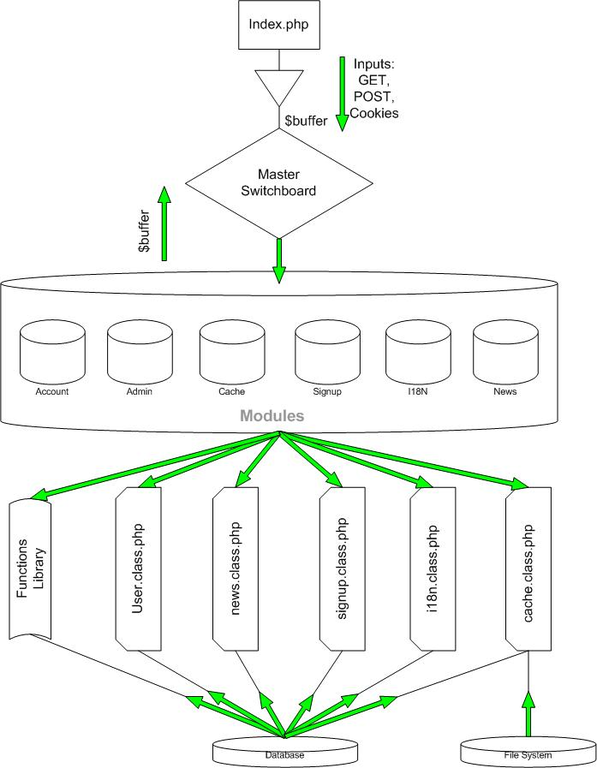
Please refer to Figure 1, previously introduced in "Real World PHP Security" and included below.

Figure 1. Our Application Model Diagram

Cleaning Up the Operating Environment

As a system administrator, you may have noticed how flexible PHP is in terms of error reporting and security. The php.ini file enables you to make considerable changes to the behavior of the PHP interpreter, which can lead to bad surprises for a PHP developer.

Before we start working on the logic of our application, we must ensure that our operating environment will behave in a predictable way. One of the things you must watch out for is PHP's magic_quotes_gpc directive, which, when enabled, escapes every single value in your GET, POST and COOKIE arrays. This may look like a great way to protect against SQL injections, but it becomes a hassle when working with binary data. Listing 1 illustrates how to detect if the magic_quotes_gpc directive was enabled and how to reverse its effect if necessary.

Listing 1. Cleaning Up the Operating Environment

Many other surprises out there waiting for you as you port your applications to different platforms. Generally speaking, you should become as familiar as possible with the directives available in php.ini. Also, use the ini_get() PHP function to find out if specific directives are enabled or not. You then are able to set up your environment in a predictable way without having to worry about the configuration of the PHP interpreter.

Database Connectivity

If you are developing a commercial application or would like your application to be as flexible as possible, one thing you should look into is using a database abstraction facility in your projects. Many database abstraction libraries are available, but PEAR::DB is a widely accepted standard that performs well, has great error handling and is quite reliable. DB currently supports 13 different database platforms. DB's documentation is quite extensive and can be found here.

Some may argue that using a database abstraction layer in your application can affect the overall performance. It does, though, bring the flexibility you need to scale your applications up to new levels and to release cross-database applications.

Although DB may not seem forgiving or friendly at first, the DB APIs are compliant with the PEAR standards, which makes its behavior predictable and allows developer to create wrappers easily.

As with any database API, the steps to perform operations on your database are as follow:

  • Establish a Connection to the Database Server: DB uses a DSN (data source name) to represent the parameters to use when establishing the connection. Many formats are supported; an example might look like this: mysql://dbuser:dbpass@localhost/db_name. You then can use DB::connect(&$dsn) to establish the connection.

  • Perform Error Handling: DB uses the PEAR standard for its error handling facility. This error handling system is well designed and is versatile enough to provide predictable error control for all PEAR packages.

  • Specify the Behavior of the Interface: This is where PEAR::DB truly shines. DB allows the developer to define how the package should operate in every aspect. Using the same interface, you can make DB work as a cursor-based result-set iterator or fetch your entire result-set in an ordered array, an array of objects or an associative array.

  • Execute Queries: Whether you want to execute a stored procedure or a simple query, DB provides simple methods that perform those operations on your database while still providing error handling. The query() method simply executes a query against your database and returns a PEAR error object if an error should occur.

  • Work with Result-Sets: DB offers many simple methods for working with result-sets and offers a myriad of data-structures to the developer, such as associative arrays, objects, indexed arrays and so on.

But DB also offers some higher-end methods to the developer, such as auto-prepare and auto-execute facilities that allow you to create templates for your SQL query and have DB handle the creation and execution of subsequent queries. It also can filter literals against special characters, regardless of the database server you are using.

Case Study: Real-World Application Design

In this section, we work on a simplistic PHP application that handles the creation and management of user accounts. Although the rest of this section is pure PHP code, it has been documented and tested extensively. This code illustrates every principle described in this article as well as the initial print article.

We use the following file hierarchy for our application, roughly based on the previous article:

/index.php (this is the only www file)
/config.inc.php (configuration file)
/lib (libraries, protected by a .htaccess)
/modules (module files, protected by a .htaccess)
/lib/config.inc.php (configuration file)
/tpl (templates, protected by a .htaccess)
/doc (project and APIs documentation)
/images
/classes (classes, protected by a .htaccess)
/misc (CSS style-sheets, JS files, etc...)

by Xavier Spriet, linuxjournal.com


Monday

Running PHP Scripts with Cron

Lots of programmers like PHP for its ability to code and develop web applications fast. Code-debugging is a lot easier than with PERL or C. However, there is one thing a lot of developers are puzzled about, “How to run PHP Scripts with crontab?”

Cron is normally available on all Unix and Linux distributions; if you cannot access it, contact your root or server administrator. It is a daemon which allows you to schedule a program or script for a specific time of execution. If you want to learn more about cron, click here or type “man crontab” at your command prompt.

I have found myself in the need to run PHP scripts at specific times. For example, to update the content of a website, to remove expired articles, to send out e-mails on a given date and a lot more. While some may think that this is were PHP is doomed, I will show you how it’s done.
A Manual crontab?

The first solution that came to my mind was to run the script directly from my browser (e.g. http://www.mydomain.com/script.php). Since I need to run my script on a regular basis, I squashed that idea. My goodness, all the extra hassle is ridiculous.

An include?

Another possible solution is to include the script in one of the pages of the site, for example the very first: “index.php”. ()

The drawbacks to this solution are, that it works but when someone accesses the “index.php”. This could cause a lot of extra overhead produced by the script. If you get a lot of traffic, the script is executed 1000 times a day and adds a lot of usage on the database and the server.
On the other hand, if you do not get a lot of traffic, or people tend to access your site over another file, this will not work out as well. If you need to run the script on a regular intervals, this is not a solution.
Crontab!

Let’s suppose you either know what cron is or have read about it using the link above. We want to run our script once a minute. So where do we go from here? Here is how you can accomplish this task.
Your PHP setup

You will need to find out the answer to the following question, “Is my PHP installed as CGI or as an Apache module?”. To find out do the following: Create a new file, name it info.php (just an example), and put in the following code, “”. Upload to your webserver and go to it with your browser.

Now check for Server API (4th item from the top), if it says “CGI”, you have PHP compiled as CGI, if it reads “Apache”, you have it running as an Apache module.
Compiled CGI

If the answer to the question above is “CGI” then you need to add a line to your PHP script. It has to be the first line of your script and must contain your server’s PHP executable location:

#!/usr/local/bin/php -q

That looks a lot like PERL now, doesn’t it? After that let’s add the necessary command to our crontab. Edit /etc/crontab and add the following line:

* * * * * php /path/to/your/cron.php

Execute the following from the command line:

Shell> crontab crontab

Be sure your “script.php” has the necessary permissions to be executable (”chmod 755 script.php”).

Now you are all set!
Apache module

If your PHP is installed using the Apache module, the approach is a little different. First, you need access to Lynx (Lynx Browser for more information). Lynx is a small web browser, generally available on Unix and Linux.

Running your PHP script will not require you to add any additional lines. You simply have to edit your /etc/crontab file and add the following line:

* * * * * lynx -dump http://www.somedomain.com/cron.php

Please note that in general, you have to specify the entire URL (with “http://” and so on). But depending on your Lynx’s configuration, the URL might be relative; I suggest always using the absolute reference as in my example above - it always works.

Again execute the following from the command line:

Shell> crontab crontab

That all it takes to get a cron job setup using PHP. Hope you have learned something new and will use it to save overhead time on the server and on the developer.
by till, htmlcenter.com

Caching PHP Programs with PEAR

Contents:

  • Caching in context
  • Where to get PEAR Cache
  • How PEAR Cache works
  • Function call caching
  • Output caching
  • Customized solutions
style="font-size:85%;">

Caching in context

Caching is currently a hot topic in the PHP world. Because PHP produces dynamic web pages, scripts must be run and results must be calculated each time a web page is requested, regardless if the results are the same each time. In addition, PHP compiles the script every time it is requested. This overhead can seriously slow down a site with heavy traffic. Fortunately, the results of a web request can be stored, or cached, and presented to matching requests without having to re-run or recompile the scripts. Commercial products like ZendCache or open-source solutions such as Alternate PHP Cache provide a means to cache the compiled version of a PHP script -- the byte-code.

While these "PHP land" solutions scratch an itch in PHP's design, "Userland" solutions can go a step further and address general bottlenecks in Web application design and programming. (The term PHP Land refers to the language level of PHP, for instance, the Zend Engine, that drives PHP 4. The term userland refers to something that is written by users of PHP.)

Imagine a commerce application with a large catalog stored in a database. It is realistic to assume that the catalog information will change only at specific times, such as once or twice a day. Still, for every request to the product's page, a database query is performed. This overhead could be easily avoided by caching either the query's result or the complete HTML output of the requested page.

PEAR's Cache package offers a framework for the caching of dynamic content, database queries, and PHP function calls.

Where to get PEAR Cache

Perl has CPAN, and TeX has CTAN. But PHP also has a central repository for classes, libraries, and modules. It's called PEAR, which stands for PHP Extension and Add-On Repository. You can read all about PEAR in OnLAMP.com's recent articles An Introduction to PEAR and A Detailed Look at PEAR.

For this article, I'll assume that you already have a PEAR environment set up. The examples in this article have been developed and tested with a development version of PEAR Cache, available either via CVS or as a snapshot here.

How PEAR Cache works

The PEAR Cache package consists of a generic Cache class and several specialized subclasses -- for example, a class to cache function calls or a script's output. The Cache class can use a variety of so-called Container classes that actually store and manage the cached data.

Following is a list of PEAR Cache's current container implementations along with their respective parameters

  • file -- The file container stores the cached data in the file system. This is the fastest container.

  • cache_dir -- This is the directory where the container stores its files.

  • filename_prefix -- The file name prefix for the cache files, for instance "cache_".

  • shm -- The shm container stores the cached data in the shared memory. Benchmarks indicate that the current implementation of this container is much slower than the file container.

  • shm_key -- The shared memory key to be used.

  • shm_perm -- Permissions for the shared memory segment.

  • shm_size -- The size of shared memory to be allocated.

  • sem_key -- The semaphore key to be used.

  • sem_perm -- Permissions for the semaphore.

  • db -- PEAR's database abstraction layer.

  • dsn -- DSN of the database connection to be used. Please refer to the PEAR DB documentation for details.

  • cache_table -- Name of the table to be used.

  • phplib -- The phplib container uses the a database abstraction layer to store its cached data.

  • db_class

  • db_file

  • db_path

  • local_file

  • local_path

  • ext/dbx -- PHP's database abstraction layer extension. This is currently the container of choice if you want to store the cached data in a database.

  • module

  • host

  • db

  • username

  • password

  • cache_table

  • persistent

The performance gain from the use of PEAR Cache greatly depends on your choice for the cache container to be used. For instance, it makes obviously no sense to store the result of a database query again into a database.

Function call caching

PEAR Cache's Function Cache module caches the output and result of any function or method, no matter if they are built-in PHP functions or user-defined ones. By default, it uses the Filefunction_cache. container and puts the cache data into a directory named

The Cache_Function class's constructor accepts up to three parameters, all three being optional:

  • $container

    Name of the cache container to use.

  • $container_options

    Array of parameters for the cache container.

  • $expires

    Number of seconds after which a cache object expires.

A cached function call is triggered by wrapping the normal function call using the Cache_Functioncall() method. Using call() is quite easy. Its first parameter gives the name of the function (or method) to call, followed by the parameters of the function (or method) to be called. The second parameter of call() is the first one of the function (or method) to be called, and so on. Let's have a look at an example: class's

Example 1: Caching function and method calls

&lt.;?php
// Load PEAR Cache's Function Cache

< 'Cache/Function.php'; // Define some classes and functions / methods // for demonstration class foo { function bar($test) { echo "foo::bar($test) "; } } class bar { function foobar($object) { echo '$'.$object.'->foobar('.$object.')
';
}
}

$bar = new bar;

function foobar() {
echo 'foobar()';
}

// Get Cache_Function object

$cache = new Cache_Function();

// Cached call to static method bar() of class foo
// (foo::bar())

$cache->call('foo::bar', 'test');

// Cached call to method foobar() of object bar
// ($bar->foobar())

$cache->call('bar->foobar', 'bar');

// Cached call to function foobar()

$cache->call('foobar');
?>

Caching of function calls comes in handy in a variety of situations such as time-consuming XSL transformations of XML sources that only change on a daily basis.


Looking back at the introductory example of a commerce application, you're now able to cache parsed template elements, or catalog information you used to pull from the database on each request.

We now go a step further and cache a script's complete output with the Cache_Output class.

Example 2: Caching a script's output

'.') );

// Compute unique cache identifier for the page we're about
// to cache. We'll assume that the page's output depends on
// the URL, HTTP GET and POST variables and cookies.

$cache_id = $cache->generateID(array('url' => $REQUEST_URI, 'post' => $HTTP_POST_VARS, 'cookies' => $HTTP_COOKIE_VARS) );

// Query the cache

if ($content = $cache->start($cache_id)) {
// Cache Hit

echo $content;
die();
}

// Cache Miss

// -- content producing code here --

// Store page into cache

echo $cache->end();
?>

With the Cache_Output class, it is easily possible to turn a dynamic, database-driven web application into a static one. This can drastically improve a site's performance.

More and more web sites are using GZIP compression for their HTML content. This reduces the server's bandwidth, and thus the costs for the generated traffic. Furthermore, it increases the user experience for those using modem connections. Cache_OutputCompression extends the functionality of the Cache_Output class, as it caches the GZIP compressed version of the generated HTML to save the CPU time needed to compress the content.

Customized solutions

In this last section, I explain how the PEAR Cache framework can be used to develop customized caching solutions. As an example, I have chosen a class called MySQL_Query_Cache that caches the result sets of SELECT queries.

Let's start with the class's variables -- constructor and destructor. The constructor is used, as before with the Cache_Function and Cache_Output classes, to transport the cache container options. The destructor closes the MySQL connection and runs the cache's garbage collection, if needed.

 '.',
'filename_prefix' => 'cache_'), $expires = 3600)
{
$this->Cache($container, $container_options);
$this->expires = $expires;
}

function _MySQL_Query_Cache() {
if (is_resource($this->connection)) {
mysql_close($this->connection);
}

$this->_Cache();
}
}
?>

Before we come to the juicy part, where we actually perform and cache the query, we need some more helper functions.

connection = mysql_connect($hostname, $username, $password) or trigger_error('Could not connect to database.', E_USER_ERROR);

mysql_select_db($database, $this->connection) or trigger_error('Could not select database.', E_USER_ERROR);
}

function fetch_row() {
if ($this->cursor <>result)) {
return $this->result[$this->cursor++];
} else {
return false;
}
}

function num_rows() {
return sizeof($this->result);
}
?>

We already have ready the functionality needed to connect to a MySQL database, to fetch a row from a cached result set, and to get the number of rows in the current set. Let's see how we perform -- and cache -- a database query:

result = $this->get($cache_id, 'mysql_query_cache');

if ($this->result == NULL) {
// Cache Miss

$this->cursor = 0;
$this->result = array();

if (is_resource($this->connection)) {
// Use mysql_unbuffered_query(), if available

if (function_exists('mysql_unbuffered_query')) {$result = mysql_unbuffered_query($query, $this->connection);
} else {$result = mysql_query($query, $this->connection);
}

// Fetch all result rows

while ($row = mysql_fetch_assoc($result)) {$this->result[] = $row;
}

// Free MySQL Result Resource

mysql_free_result($result);

// Store result set in cache

$this->save($cache_id, $this->result, $this->expires, 'mysql_query_cache');
}
}
} else {
// No SELECT query, don't cache it

return mysql_query($query, $this->connection);
}
}
?>

Example 3: The MySQL query cache in action

connect('hostname', 'username', 'password', 'database');
$cache->query('select * from table');

while ($row = $cache->fetch_row()) {
echo '

';
print_r($row);
echo '

';
}
?>

With this information, you should be able to get started caching PHP web pages for most common applications.
by Sebastian Bergmann
onlamp.com

Sunday

LAMP development with XAMPP

If you have ever had to set up a Linux, Apache, MySQL and PHP or Perl installed and running at the same time you know what hassle it can be. If you are new Linux it can be a rather daunting experience just trying to set everything up, nevermind learning scripting languages like PHP, Perl and a database like MySQL or SQL Lite.

XAMPP is a single packaged download from Apache Friends which provides all of the pieces of software needed, plus more you probably don't need, to make Apache installations with server-side scripting and a few database options ready to go in a testing or development environment.

In this article we will focus on getting XAMPP running on Linux, it will also work on Windows and a version for Sun’s Solaris is also available. For our example we will use a Debian-based Linux distribution, but just about any flavour of Linux will work. To start, you will need to download the XAMPP package for Linux from the SourceForge Web site.

The XAMPP includes the following software:

  • Apache 2
  • MySQL 4
  • PHP 5, 4 & PEAR
  • SQLite 2.8.9 + multibyte (mbstring) support
  • Perl 5
  • ProFTPD
  • phpMyAdmin
  • OpenSSL
  • Freetype
  • libjpeg, libpng
  • gdbm
  • zlib
  • expat
  • Sablotron
  • libxml
  • Ming
  • Webalizer
  • pdf class
  • ncurses
  • mod_perl
  • FreeTDS
  • gettext
  • IMAP C-Client 2002b
  • OpenLDAP (client)
  • mcrypt
  • mhash
  • Turck MMCache
  • cURL
  • libxslt
  • phpSQLiteAdmin
  • MD5 checsum:

Security note
XAMPP is recommended to be only used in a development environment and not in production as the system has very loose security settings. The system can be tweaked to be more secure and we recommend following the steps here.

Once the package is downloaded you will need to extract it to a file. You can do this in two ways depending on which version of Linux you are using. You can use a file manager and extract the package into the /opt file.

To extract the files manually you can a console and type in the following:

tar xvfz xampp-linux-*.tar.gz -C /opt

Make sure you are logged in as the system administrator. To do this manually type in su. It will then ask for your administration password. Type in the system's administration password.

Once this file has been extacted you will need open the file "lampp" in the /opt/lammp directory. If you open this using the file manager it will prompt a command shell with all the user options as shown in figure 1 below.


Firgure 1: The commands for XAMMP

If you need to do this manually, open a console and type the following command:

/opt/lampp/lampp start

The screen should show the same shell as shown in figure 1. After everything has started the next step is to test the Apache Server is running. The easiest way to do this is to open up a browser of your choice and type in the following:

http://localhost

XAMPP has a splash screen that will look something like in figure 2 with sample scripts ready for testing and use. Your LAMP environment is now ready to test your own Web applications.


Lets Shindig

Following the introductory presentation on OpenSocial at the Google Developer Day conference in Sydney, Dan Peterson and John Hjelmstad delved into the workings of Shindig with their presentation "Apache Shindig: Make your social site an OpenSocial container".

What is Shindig?

Shindig, a project in Apache Software Foundation Incubation is an open source implementation of OpenSocial and gadgets.

At present Shindig provides two ports, one in Java and one in PHP, both of which support version 0.7 of OpenSocial. There is work in progress for version 0.8 which will introduce the RESTful API. Some containers using the Java version of Shindig are hi5, iGoogle and orkut.

There is a strong open source community behind Shindig, producing some high quality code, with updates occurring as OpenSocial evolves.

Shindig Architecture

Dan and John showed a diagram similar to the one below to illustrate the structure of Shindig. It is made up of three main components.

|> Gadget Server:

OpenSocial gadget is going to be composed of HTML, CSS and JavaScript encapsulated inside an XML file. The Gadget Server will process that XML file and render it inside an iFrame. Shindig downloads your gadget and takes in the metadata, upon which it performs translations to deliver the content to the user in their language. It then looks at the preferences that might have been set, by taking in the variables and doing substitutions on the gadget content. Next up, it examines the features which are JavaScript libraries, so the gadget can behave in a certain way on the social site. An example of a feature is all the different views of a gadget. The final product is the HTML rendered inside an iFrame.

|> OpenSocial data server:

This server needs to be on the same domain as the gadget, as they talk to each other. Social information is exchanged with the gadget via a JSON wire format. There are three kinds of social information, they are: people, friends and activities.

Version 0.8 will introduce the RESTful API for non-JavaScript access to OpenSocial data. This will provide developers with the opportunity to build more interesting apps and for external sites to interact with social information.

The data server also provides persistent data storage for gadgets, but there is a limit to how much you can store.

The benefit of all this to developers is that they do not need any infrastructure of their own to have a gadget on a social website.

|> Gadget Container JavaScript:

This is a sample of core JavaScript functionality you may implement on your gadgets, and involves things like a UI layout and security.

Get Started with Shindig

To become an OpenSocial container you need to first connect the Shindig OpenSocial data server to your database and then add gadgets to your site. To add gadgets you need to do a few things. First, add some JavaScript libraries for remote procedure calls (RPC). You then need a user interface from which users can choose what gadgets to put on their page and finally add some UI elements such as a gadget gallery to your website.

By Lana Kovacevic
www.builderau.com.au

Thursday

Creating flexible user applications using widget technologies

Widgets and gadgets are small applications that run on your desktop or in your web browser which enable you to keep track of things like the weather forecast or share prices. But widgets and gadgets can also be used to add additional functionality to existing applications to create flexible and personalised learning environments. We spoke to Scott Wilson from JISC CETIS and the Institute for Educational Cybernetics at the University of Bolton about the potential for using widgets in educational technologies.

Introduction

Widget is a funny word. For some people it means a small device at the bottom of a can of Guinness for others it’s a character in Marvel comics. In technology terms desktop widgets (or gadgets) are small programmes that run on your desktop to give you useful information.

The Wikipedia definition of a desktop widget is: "a small specialized GUI application that provides some visual information and/or easy access to frequently used functions such as clocks, calendars, news aggregators, calculators and desktop notes. These kinds of widgets are hosted by a widget engine."

On my desktop I have a small Yahoo widget toolbar with the weather forecast, the date and the capacity of my computer battery, information on the web or my computer I’d otherwise have to go and search for [2]. Widgets and gadgets can do the same job for educational applications too. The TENCompetence project has been using widgets to create an innovative run time system for IMS Learning Designs [3]. We spoke to Scott Wilson about widgets, the TENCompetence project, and the potential for using of widget technologies in institutional applications.

Christina Smart: How do widgets work?

Scott Wilson: If you think about the e-Framework and its service layers, widgets are at the user agent, or application layer [4]. At one level you have the e-Framework, a set of systems exposing services. At the other end you have what we call containers, which can be VLEs, blogs, social applications – the applications that users make use of. For widgets to work we need another element which is the widget engine or server which works with the container. The widget engine will hold any number of widgets that you want your users to be able to access. So the container might be something like Moodle [5] and the engine might be something like Wookie (the engine we used in TENCompetence). Typically the widgets are aligned with or call services, either directly, or indirectly through a layer of mash-ups or processes (Figure 1).

soa including a widget engine

Figure 1: A service oriented architecture including a widget engine

CS: But widgets are discrete applications aren’t they?

SW: Yes. For the user, widgets are doing a particular job which can either be done entirely locally within their own code, or by calling remote services or mash-ups which are chains of services. So from that view point there is potentially a direct relationship between having a widget front end model and having a service oriented architecture.

Let’s take the timetabling example. The institutional Management Information System for timetabling might be something like CELCAT Timetabler [6]. On top of that the institution might have developed a timetable web service to interact with CELCAT. Then you can add a widget like a personal timetable widget which can be displayed in your VLE, or an iPhone, or other application. So there’s a connection all the way through the architecture.

What we’re talking about now in the widget world is very much what we were talking about a couple of years ago with composite applications [7]. What we have now is a fairly well elaborated and standardised way of doing what the e-Framework called the user agent layer. While we did have some ideas before about how you implemented the user agent layer using things like portlets, widgets offer a more modern approach to composition that users are becoming increasingly familiar with. What is especially powerful about widgets is that the same widgets can be displayed through a variety of different containers e.g. WebCT [8] and Elgg [9]. All the containers need is a widget plug-in.

CS: And how easy is it to write the plug-in for the containers?

SW: Very easy. You write a plug-in for the VLE or container, and the plug-in talks to the engine, to tell it to display particular widgets, so we’re talking purely about the rendering of the widget. There is of course another connection by which the widget talks directly to a service via the web.

With many of today’s web applications there are already built-in local extension points, such as Moodle Blocks and Wordpress Plug-ins, and so what we do is use those to enable users to add widgets too.

It’s important to distinguish, though, between native plug-in systems used in particular applications and the kinds of widgets we are discussing here. Most applications have native plug-ins, even “widget” capabilities, which are tied to that application. For example, there is a PHP API for writing widgets for Wordpress. However, what we’ve been doing is using an external widget engine and set of standards-based APIs, so the widget developer doesn’t need to know anything about the container, which means the same widget can be deployed in Wordpress and Moodle without any extra work.

CS: Are there any big differences between using widgets in web containers and on the desktop?

SW: What is surprising, based on the W3C work, is how little difference there is in terms of how you may want to write, package and deploy widgets [10]. There are two big differences though: one is multi-user capability, and the other is the security aspect.

Unlike desktop widgets, web widgets can run in containers that are shared by many users, and so it becomes possible to create widgets that are multi-user. There are already social widgets in the sense of Facebook applications and Google OpenSocial gadgets, but not really many collaborative widgets, and so we focussed on extending the W3C specification in that direction. So you can create widgets that enable chat between users within a container-specific context, such as a Moodle course.

On security, the biggest issue is that a web widget may want to communicate using AJAX with services across the web in different domains from that of the container application. Most browsers prevent this type of activity using what is sometimes called a “same origin policy”. This is a useful security precaution, however this also completely blocks the functionality you want to support. So for web widgets to work they need to be able to access services using a server-side proxy offered by the widget engine. We use a whitelist-based proxy that the widget engine administrator can configure. However, we then have the issue of how widgets can make use of services that require some form of authentication or authorization.

An emerging technology that’s really important in here is something called oAuth. OAuth is an open protocol which allows a standard method for secure API authentication for desktop, mobile and web applications [11]. One example is when I have a Gmail gadget running in a container such as Netvibes, somehow I need to get my credentials to the Gmail service and I don’t want to necessarily pass them through the container or server. oAuth enables the transaction to happen, prompting me to grant access from Gmail to this widget to access my mail, but without exposing my login details or user id to the container or the widget.

CS: How have you been using widgets in the TenCompetence project?

SW: At Bolton we’ve been developing two pieces of software as part of the TENCompetence projectfunded by the European Commission through the IST programme. We’ve developed a new IMS Learning Design editor called ReCourse which allows users to author more complex Units of Learning [12]. However, there has also been a need for more sophisticated run-time tools to be able to run these units and co-ordinate appropriate activities for learners [13]. So in the project we’ve been exploring how desktop and web widgets could be used to provide chat, discussion and voting services within a run-time Learning Design environment, so that users could seamlessly be offered the features specified by a particular learning design. Paul Sharples is the main developer on this and he has got a number of widgets working within a number of environments including the SLED learning design run-time tool (Figure 2).

Forum Widget in SLED

Figure 2: A Forum widget running within the SLED run-time engine

SW:There are two widget engines that we have been working on. The one we’ve used for the TENcompetence project is called Wookie. Wookie follows the W3C Widget specification, the other one is called Shindig for Apache and that implements Google Gadgets [14]. The overall approach seems to be one that has a lot of merit to it. The neat thing about these systems we’re talking about is that the widget is written purely in Javascript, and they have no other code, so the same widget will work on a VLE written in PHP, a staff page written in C#, a blog that uses Java – it doesn’t matter what platform, what server, what language they are written in, the widget will work in exactly the same way. As we’ve followed the W3C specification, and that is quite close to Apple Dashboard, it’s actually been possible for us to easily convert widgets written for Dashboard to run in all kinds of web-based containers.

Plug-ins at the container level, such as Moodle blocks, Web CT modules and Blackboard building blocks all have to be written to the APIs defined by that system and in the language of that system. So you’d have to write a plug-in for each individual system for each widget. Whereas with widgets you still write a plug-in for each system, but it’s much simpler to write, it essentially just says, “show widget” and the user configures it with the type of widget to display (“chat”, “voting”, etc). It’s a “write once show many strategy”. To demonstrate the approach we wrote a widget plug-in for Moodle, which is basically a blank block in Moodle with one property which is the widget type e.g. chat (Figure 3). It also of course makes it easier to change the widget, simply adding a new chat widget to the widget engine will display the new widget in all your different containers. Potentially it’s a good way for institutions to manage the services they want as part of their service oriented architecture, without having to do a lot at the front end.

Moodle with widgets

Figure 3: Moodle with two Apple Dashboard widgets and a chat widget

CS: What do you think in a broader sense are the wider applications for widget technologies?

SW: What it influences is how as an institution you deliver your service oriented architecture to users without mandating a single user application. So looking at the diversity of containers (Figure 4), that includes VLEs, personal staff pages, Blogs, iphone, social software, all of these are containers capable of displaying widgets. Some of these will have a widget engine built in (e.g. iPhone), some will have to have one attached (eg VLEs and blogs). The institution can use a single timetable widget, located on its server and know that that widget can be displayed in ALL the different containers that people use. That widget can be linked to one web service to provide the data. Take the timetabling example again, The timetable system can have a single service to access timetable data and institutions can provide a single widget which can be displayed in a diverse set of containers from the institutional VLE to people’s blogs or iPhones. This gives students and teachers a lot of variety and flexibility over the tools that they use, with a constrained architecture.

Widgets in multiple applications

Figure 4: The same widget can be rendered in a variety of different applications and containers

SW: This approach links very closely to the original e-Framework ideas. A couple of years ago I wrote an article about how the e-Framework could allow greater pedagogic diversity at the level of the user interface [15]. This is the technology that can really make that happen, because before we had to rely upon assembling these composite applications, pretty much by hand. Whereas now we can just attach a widget engine and a widget plug-in and you can keep using Moodle if you want, you don’t need to build a new service oriented application, but you can incrementally increase functionality of your legacy systems. I believe it could give high impact benefits for low investment of effort.

Conclusion

So the power of widget technologies is that it offers institutions a relatively easy way to provide additional functionality to a variety of existing user applications. Given the time and effort that institutions spend in familiarising staff with new applications widget technologies clearly have a lot to offer. Further information on the W3C specification for widgets can be found on the W3C web site [10]. The Google Gadgets [16] and Yahoo widgets sites [2] are also good places to discover desktop widgets. The more adventurous might try building their own widgets using the Sprout widget building tool [17].

courtsy: Christina Smart[http://www.elearning.ac.uk]
Tuesday

How Jquery can help to create Web2 application

What's jQuery?

Created by John Resig in early 2006, jQuery is a great library for anyone who works with JavaScript code. Whether you're new to the JavaScript language and want a library to address some of the complexities of Document Object Model (DOM) scripting and Ajax or you're an advanced JavaScript guru and tired of the boring repetition involved with DOM scripting and Ajax, jQuery will suit you well.

jQuery helps you keep your code simple and succinct. You no longer have to write a bunch of repetitious loops and DOM scripting library calls. With jQuery, you can get right to the point and express yourself in the fewest possible characters.

The jQuery philosophy is certainly unique: It's designed to keep things simple and reusable. When you understand and feel comfortable with the philosophy, you'll start to see just how much jQuery can improve the way you program.

Back to top

Some simple simplifications

Here's a simple example of the impact jQuery can have on your code. To do something really simple and common, such as attach a click event to every link in an area of a page, you'd use plain JavaScript code and DOM scripting, as shown in Listing 1.

Listing 1. DOM scripting without jQuery


var external_links = document.getElementById('external_links');
var links = external_links.getElementsByTagName('a');
for (var i=0;i < link =" links.item(i);" onclick =" function()"> elements inside the external_links element. That's a mouthful to say in English -- and even in DOM scripting -- but in CSS, it couldn't be simpler.

The $() function returns a jQuery object containing all the elements that match the CSS selector. A jQuery object is something like an array but comes with a ton of special jQuery functions. For example, you can assign a click handler function to each element in the jQuery object by calling the click function.

You can also pass an element or an array of elements to the $() function, and it will wrap a jQuery object around the elements. You might want to use this functionality to employ jQuery functions on things like the window object. For example, you typically assign the function to the load event like this:

window.onload = function() {
// do this stuff when the page is done loading
};


Using jQuery, you write the same code like this:

$(window).load(function() {
// run this when the whole page has been downloaded
});


As you probably already know, waiting for the window to load is painfully slow, because the whole page must finish loading, including all the images on the page. Sometimes, you want the images to finish loading first, but most of the time, you just need the Hypertext Markup Language (HTML) to be there. jQuery solves this problem by creating a special ready event on the document, used like this:

$(document).ready(function() {
// do this stuff when the HTML is all ready
});


This code creates a jQuery object around the document element, then sets up a function to call the instance when the HTML DOM document is ready. You can call this function as many times as necessary. And, in true jQuery style, a shortcut calls this function. Simply pass a function to the $() function:

$(function() {
// run this when the HTML is done downloading
});


So far, I've shown you three different ways to use the $() function. With a fourth way, you can create an element using a string. The result is a jQuery object containing that element. Listing 3 shows an example that adds a paragraph to the page.

Listing 3. Creating and appending a simple paragraph


$('
')
.html('Hey World!')
.css('background', 'yellow')
.appendTo("body");


As you might have noticed from the previous example, another powerful feature of jQuery is method chaining. Every time you call a method on a jQuery object, the method returns the same jQuery object. This means that if you need to call multiple methods on a jQuery object, you can do it without re-typing the selector:

$('#message').css('background', 'yellow').html('Hello!').show();


Back to top

Ajax made simple

Ajax couldn't be any easier than it is with jQuery. jQuery has a handful of functions that make the easy stuff really easy and the complex stuff as simple as possible.

A common use of Ajax is to load a chunk of HTML into an area of the page. To do that, simply select the element you need and use the load() function. Here's an example that updates some statistics:

$('#stats').load('stats.html');


Often, you simply need to pass some parameters to a page on the server. As you'd expect, this is incredibly simple in jQuery, too. You can use choose between $.post() and $.get(), depending on which method you need. You can pass an optional data object and callback function if you need them. Listing 4 shows a simple example that sends data and uses a callback.

Listing 4. Sending data to a page with Ajax


$.post('save.cgi', {
text: 'my string',
number: 23
}, function() {
alert('Your data has been saved.');
});


If you really want to do some complex Ajax scripting, you need the $.ajax() function. You can specify xml, html, script, or json, and jQuery automatically prepares the result for your callback function so that you can use it right away. You can also specify beforeSend, error, success, or complete callbacks to give the user more feedback about the Ajax experience. In addition, other parameters are available with which you can set the timeout of an Ajax request or the "Last Modified" state of a page. Listing 5 shows an example that retrieves an XML document using some of the parameters that I mentioned.

Listing 5. Complex Ajax made simple with $.ajax()


$.ajax({
url: 'document.xml',
type: 'GET',
dataType: 'xml',
timeout: 1000,
error: function(){
alert('Error loading XML document');
},
success: function(xml){
// do something with xml
}
});


When you get the XML back in the success callback, you can use jQuery to look through the XML the same way you do with HTML. This makes it easy to work with an XML document and integrate the contents and data into your Web site. Listing 6 shows an expansion on the success function that adds a list item to the Web page for each element in the XML.

Listing 6. Working with XML using jQuery


success: function(xml){
$(xml).find('item').each(function(){
var item_text = $(this).text();

$('

  • ')
    .html(item_text)
    .appendTo('ol');
    });
    }


    Back to top

    Animate your HTML

    You can use jQuery to take care of basic animations and effects. At the heart of the animation code is the animate() function, which changes any numeric CSS style value over time. For example, you can animate height, width, opacity, or position. You can also specify the speed of the animation, either in milliseconds or in one of the predefined speeds: slow, normal, or fast.

    Here's an example that animates the height and width of an element at the same time. Notice that there is no start value -- only the end value. The start values are taken from the current size of the element. I've also attached a callback function.

    $('#grow').animate({ height: 500, width: 500 }, "slow", function(){
    alert('The element is done growing!');
    });


    jQuery makes the more common animations easier with built-in functions. You can use show() and hide() elements, either instantly or at a specified speed. You can also make elements appear and disappear by using fadeIn() and fadeOut() or slideDown() and slideUp(), depending on what kind of effect you're looking for. Here's a simple example that slides down a navigation:

    $('#nav').slideDown('slow');


    Back to top

    DOM scripting and event handling

    jQuery is, perhaps, best at simplifying DOM scripting and event handling. Traversing and manipulating the DOM is easy, and attaching, removing, and calling events is completely natural and much less error prone than doing it by hand.

    In essence, jQuery makes it easier to do things that are common with DOM scripting. You can create elements and use the append() function to link them to other elements, use clone() to duplicate elements, set the contents with html(), delete the contents with the empty() function, delete the elements altogether with the remove() function, and even use the wrap() function to wrap the elements with another element.

    Several functions are available for changing the contents of the jQuery object itself by traversing the DOM. You can get all the siblings(), parents(), or children() of an element. You can also select the next() or prev() sibling elements. Perhaps most powerful is the find() function, which allows you to use a jQuery selector to search through the descendants of elements in your jQuery object.

    These functions become more powerful when used with the end() function. This function is like an undo function, going back to the jQuery object you had before you called find() or parents() or one of the other traversing functions.

    When used together with method chaining, these functions allow complex operations to look simple. Listing 7 shows an example in which you find a login form and manipulate several elements around it.

    Listing 7. Traversing and manipulating the DOM with ease


    $('form#login')
    // hide all the labels inside the form with the 'optional' class
    .find('label.optional').hide().end()

    // add a red border to any password fields in the form
    .find('input:password').css('border', '1px solid red').end()

    // add a submit handler to the form
    .submit(function(){
    return confirm('Are you sure you want to submit?');
    });


    Believe it or not, this example is just a single, chained, line of code spread out with whitespace. First, I selected the login form. Then, I found the optional labels inside it, hid them, and called end() to go back to the form. I found the password field, made the border red, and again called end() to go back to the form. Finally, I added a submit event handler to the form. What's especially interesting about this (besides its obvious brevity) is that jQuery completely optimizes all the query operations, making sure that you don't have to find an element twice when everything is nicely chained together.

    Handling common events is as simple as calling a function like click(), submit(), or mouseover() and passing it an event handler function. Additionally, you have the option of assigning a custom event handler using bind('eventname', function(){}). You can remove certain events using unbind('eventname') or all events with unbind(). For a complete list of ways to use these and other functions, check out the jQuery application program interface (API) documentation in the Resources.

    Back to top

    Unleash the power of jQuery selectors

    Often, you select elements by ID, such as #myid, or by class name, such as div.myclass. However, jQuery has a rather complex and complete selector syntax that allows you to select nearly any combination of elements in a single selector.

    jQuery's selector syntax is based heavily on CSS3 and XPath. The more you know about CSS3 and XPath syntax, the better you'll be at using jQuery. For a complete list of jQuery selectors, including CSS and XPath, check out the links in Resources.

    CSS3 contains some syntax that not every browser supports, so you don't see it often. However, you can still use CSS3 in jQuery to select elements, because jQuery has its own, custom selector engine. For example, to add a dash inside every empty column of a table, use the :empty pseudo-selector:

    $('td:empty').html('-');


    What about finding every element that doesn't have a certain class? CSS3 has a syntax for that, too, using the :not pseudo-selector. Here's how you can hide every input that doesn't have a class of required:

    $('input:not(.required)').hide();


    You can also join multiple selectors into one using commas, just as in CSS. Here's a simple example that hides every type of list on the page at the same time:

    $('ul, ol, dl').hide();


    XPath is a powerful syntax for finding elements in a document. It's a bit different than CSS and lets you do a few things you can't do with CSS. To add a border to the parent element of every check box, you can use XPath's /.. syntax:

    $("input:checkbox/..").css('border', '1px solid #777');


    jQuery adds extra selectors that aren't available in CSS or XPath, as well. For example, to make a table more readable, you would typically attach a different class name to every odd or even row of the table -- otherwise known as striping the table. Doing this with jQuery is a cinch, thanks to the :odd pseudo-selector. This example changes the background of every odd row in tables with a striped class:

    $('table.striped > tr:odd').css('background', '#999999');


    You can see how the power of jQuery selectors can simplify your code. Whatever selection of elements you want to affect, no matter how specific or obscure, you can probably find a way to define them using a single jQuery selector.

    Back to top

    Extend jQuery with plug-ins

    Unlike with most software, writing plug-ins for jQuery isn't a huge ordeal with a complex API. In fact, jQuery plug-ins are so easy to write that you might want to write a few to make your code even simpler. Here's the most basic jQuery plug-in you can write:

    $.fn.donothing = function(){
    return this;
    };


    Although simple, this plug-in does require a bit of explanation. First, to add a function to every jQuery object, you must assign it to $.fn. Next, this function must return this (the jQuery object) so that it doesn't break method chaining.

    You can easily build on top of this simple example. To write a plug-in to change the background instead of using css('background'), you use this:

    $.fn.background = function(bg){
    return this.css('background', bg);
    };


    Notice that I could just return the value from css(), because it already returns the jQuery object. So, method chaining will still work fine.

    I recommend that you use jQuery plug-ins anytime you find that you repeat yourself. For example, you might use a plug-in if you're using the each() function to do the same thing over and over.

    Because jQuery plug-ins are so easy to write, hundreds of them are available for you to use. jQuery has plug-ins for tabs, rounded corners, slide shows, tool tips, date selectors, and probably anything else you can imagine. For a complete list of plug-ins, check out the Resources.

    The most complex and most widely used plug-in is Interface, an animation plug-in that handles sorting, drag-and-drop functionality, complex effects, and other interesting and complex user interfaces (UIs). Interface is to jQuery what Scriptaculous is to Prototype.

    Also popular and useful is the Form plug-in, which allows you to easily submit a form in the background using Ajax. This plug-in takes care of the common situation in which you need to hijack the submit event of a form, then find all the different input fields and use them to construct an Ajax call.

    Back to top

    Life after jQuery

    I've only scratched the surface of what is possible with jQuery. jQuery is fun to use, because you always learn new tricks and features that seem so natural. jQuery simplifies your JavaScript and Ajax programming completely from the first moment you use it; every time you learn something new, your code gets a bit simpler.

    After learning jQuery, I've had a lot more fun programming in the JavaScript language. All the boring stuff is taken care of, so I can focus on coding the juicy stuff. With jQuery, I can barely remember the last time I wrote a for loop. I even cringe at the thought of working with other JavaScript libraries. jQuery has honestly and truly changed the way I look at JavaScript programing forever.
    courtsy: ibm.com

    Beyond Spot-Checking: Why LLM Applications Require Specialized Evaluation

      images generated by meta ai Building applications with Large Language Models (LLMs) feels deceptively fast at first. A single engineer can...