Showing posts with label mac. Show all posts

Friday

How to create a keyboard shortcut for the Mac system


unplush

When I work on any of my Mac systems say Mac Book Pro I love to use the keyboard. So need to keep the Mac a little far from my eyesight. And then I need to make the Display Text one step larger on System Settings. So this is annoying for me as need to do this process and back to smaller text often.

This kind of job can be done with the help of Apple script. See first the manual steps:

open the system settings and go to Display [I am using MacBookPro M1 with Mac OS Ventura 13.3.x
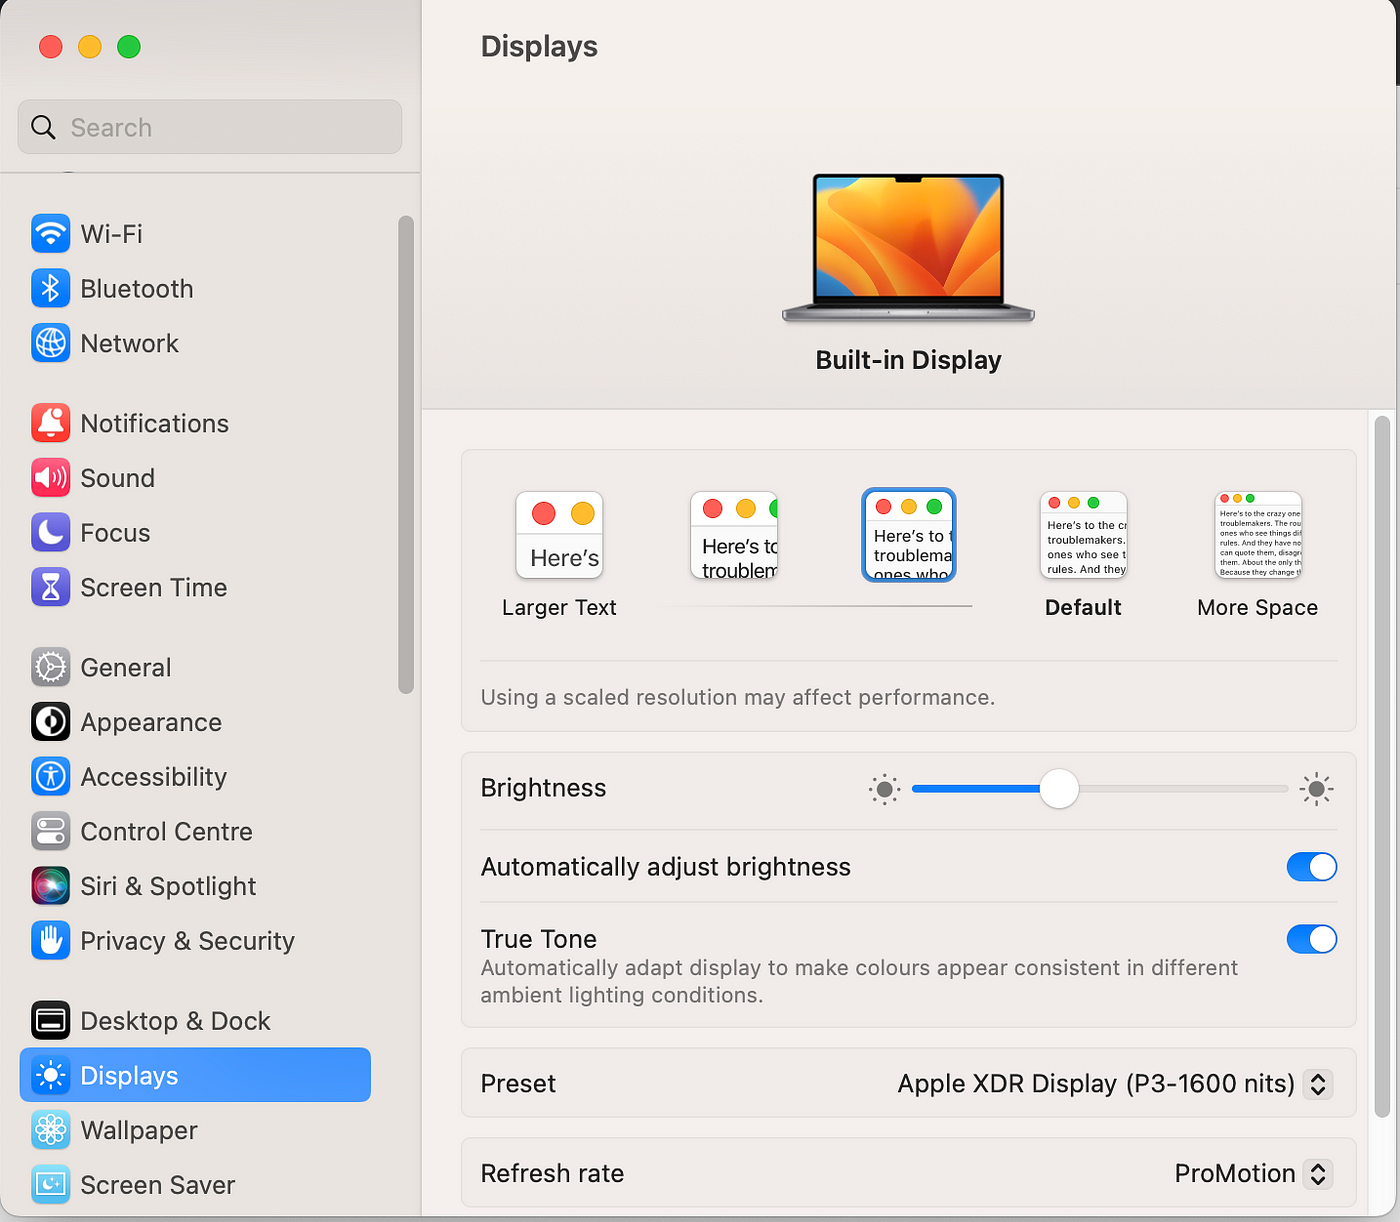
You can select the Text size as per your comfortable level.

How to automate this process with toggle. So the same key combinations can increase and decrease the text size here without opening the system settings and following all the steps.

  1. Open the Automator App and select Quick Action
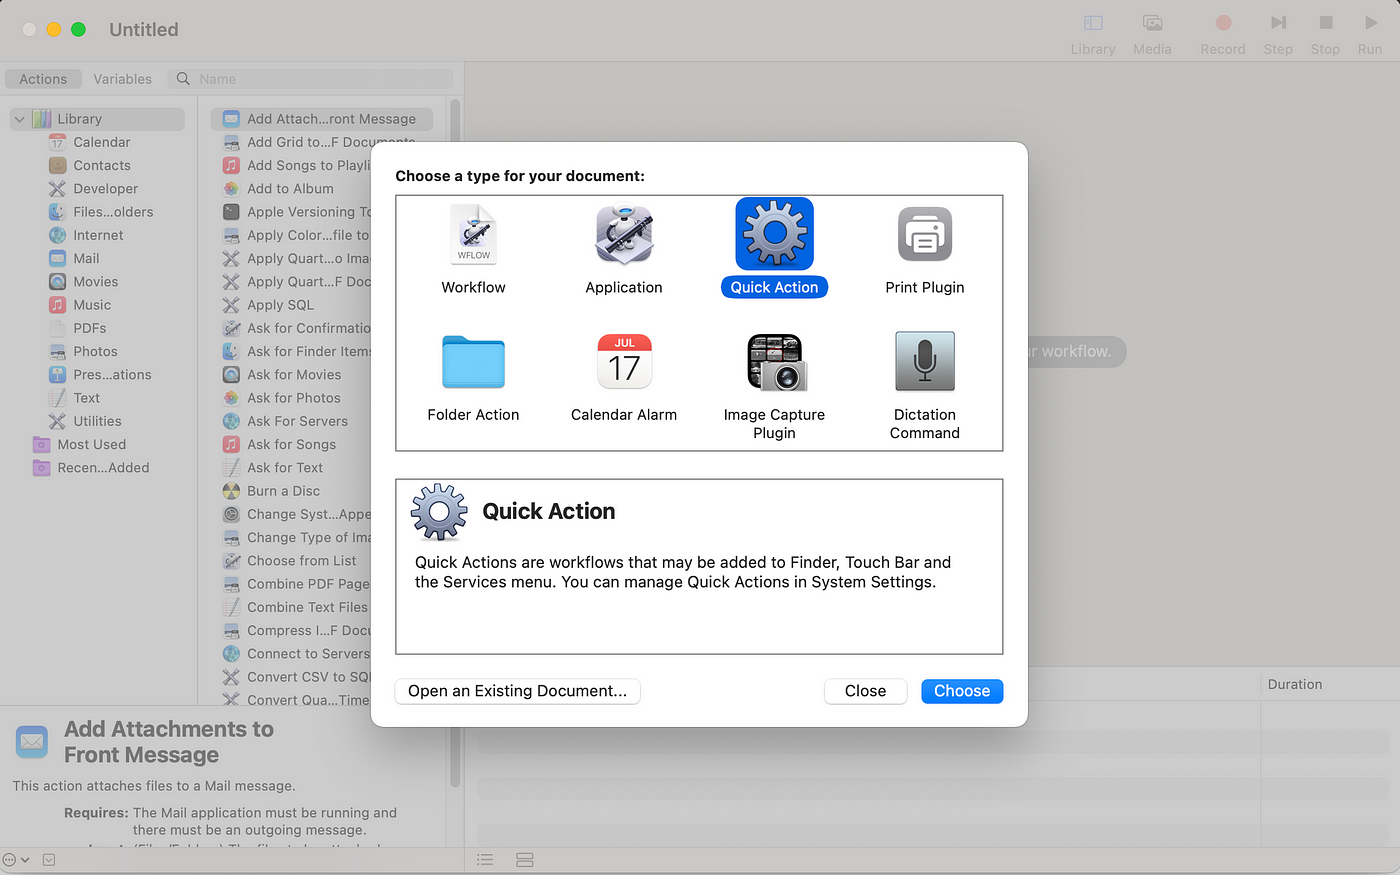
  1. It will open by double click
  2. Search the Apple script from the left top search panel
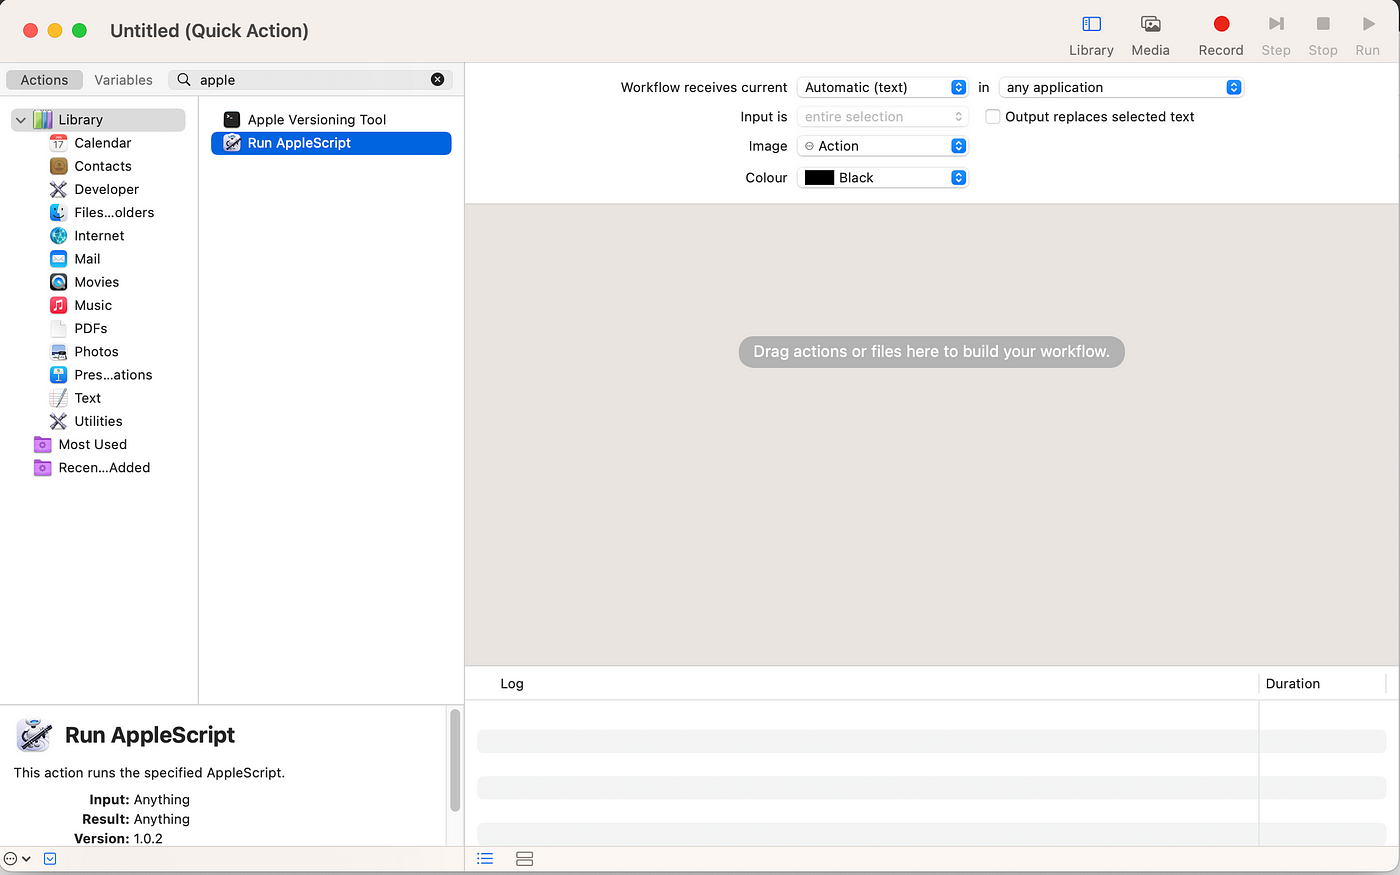
  1. It will open an editor in the right pen
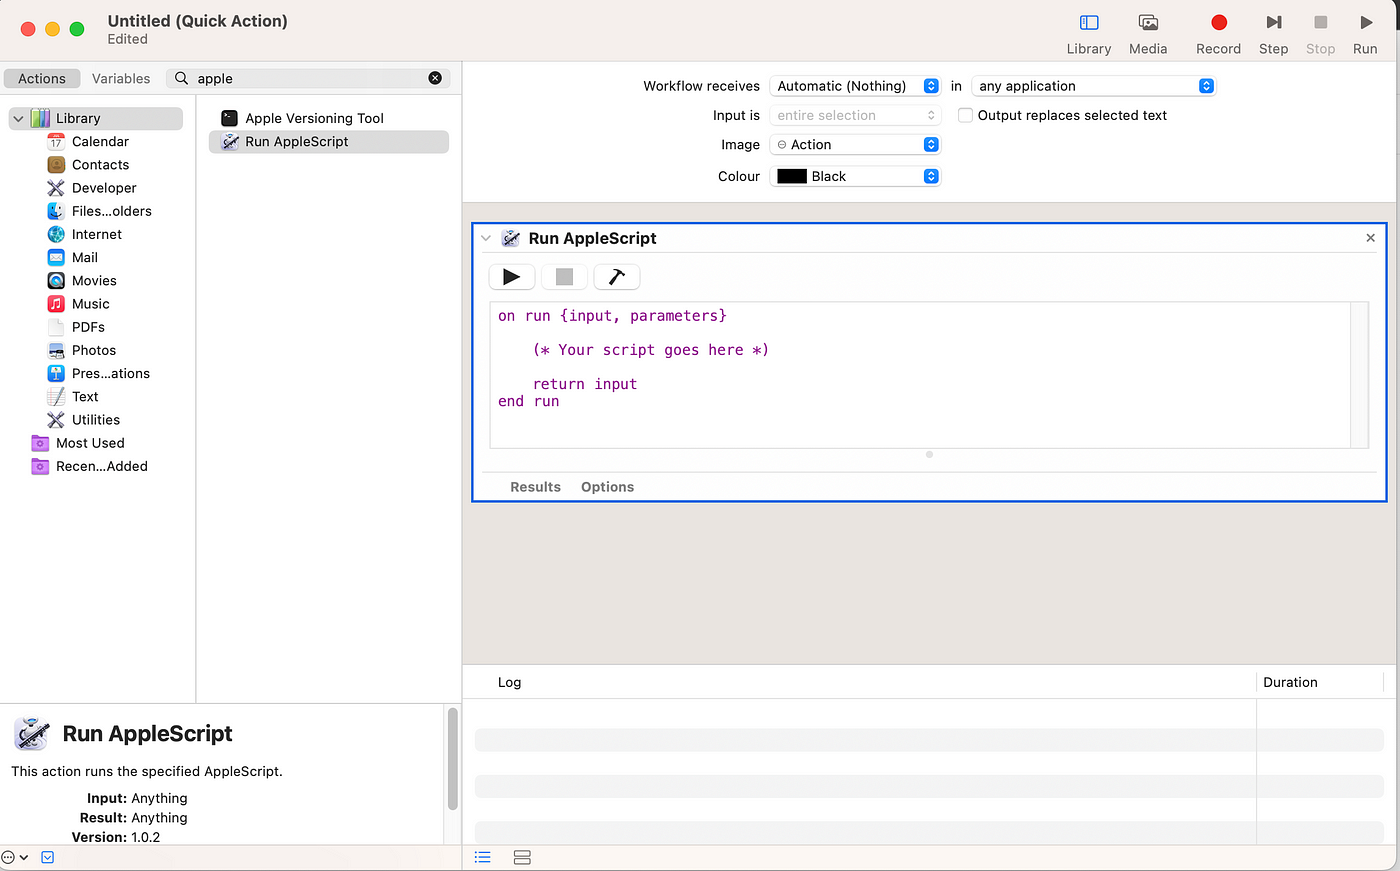
  1. Insert the code then it should look like
on run {input, parameters

do shell script "open x-apple.systempreferences:com.apple.preference.displays"

tell application "System Events"

tell application process "System Settings"

repeat until (exists UI element 1 of group 1 of scroll area 2 of group 1 of group 2 of splitter group 1 of group 1 of window 1)

delay 0.1

end repeat

tell window 1 #"Displays"

set displayOptions to UI element 1 of group 1 of scroll area 2 of group 1 of group 2 of splitter group 1 of group 1

set StandardRes to button 3 of displayOptions

set MoreSpaceRes to button 2 of displayOptions


if focused of StandardRes is false then

click StandardRes

else

click MoreSpaceRes

end if


if focused of MoreSpaceRes is false then

click MoreSpaceRes

else

click StandardRes

end if


end tell

end tell

end tell

quit application "System Settings"

return input

end run}
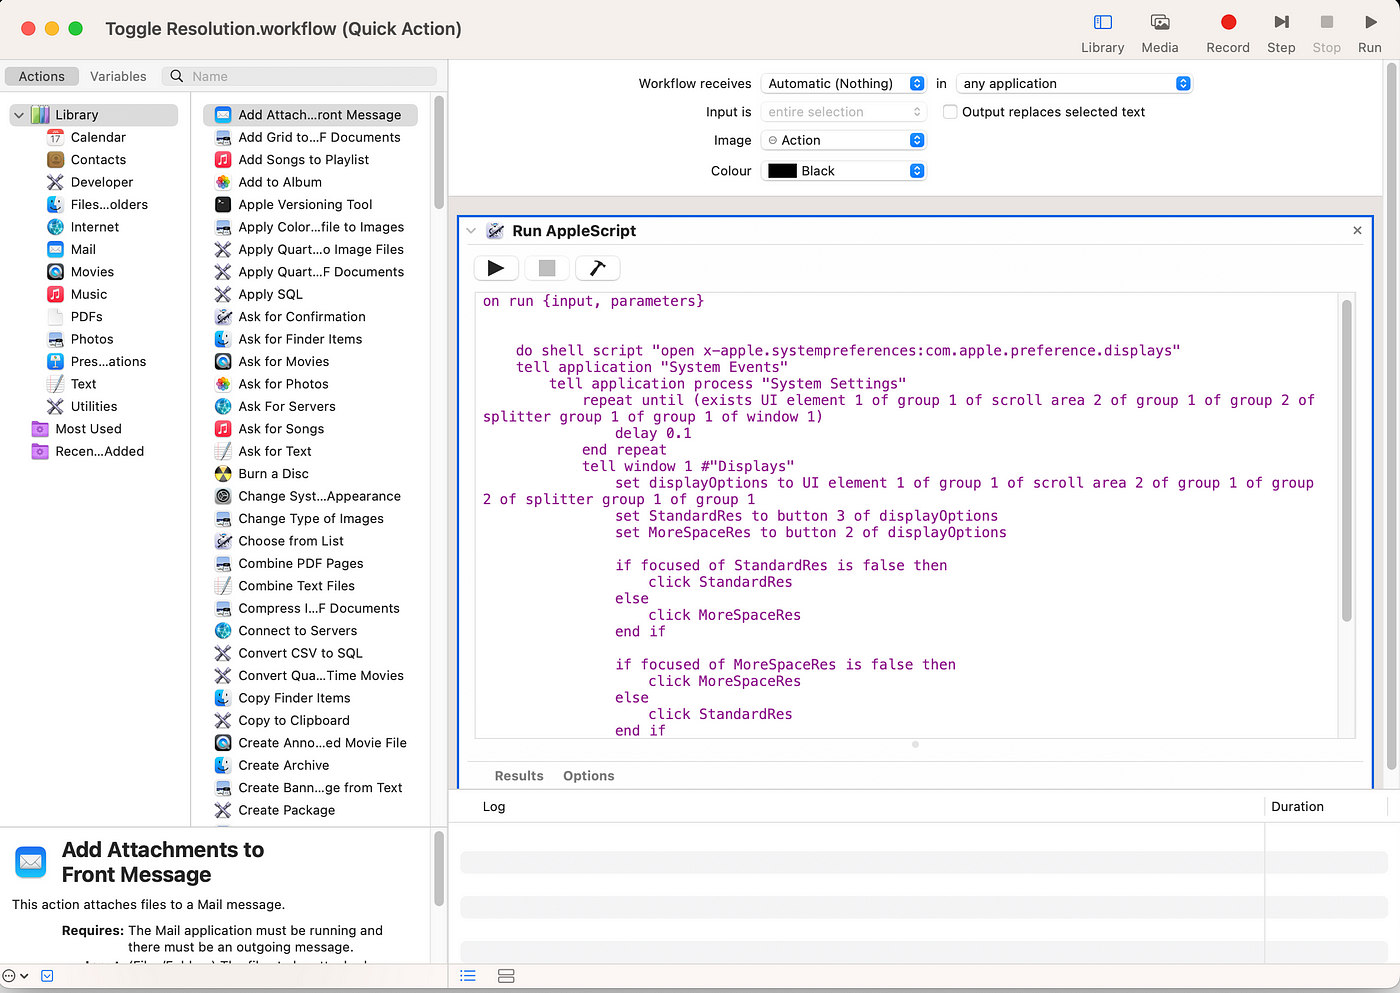
You can test by clicking the run button and then save -> close the Automator app

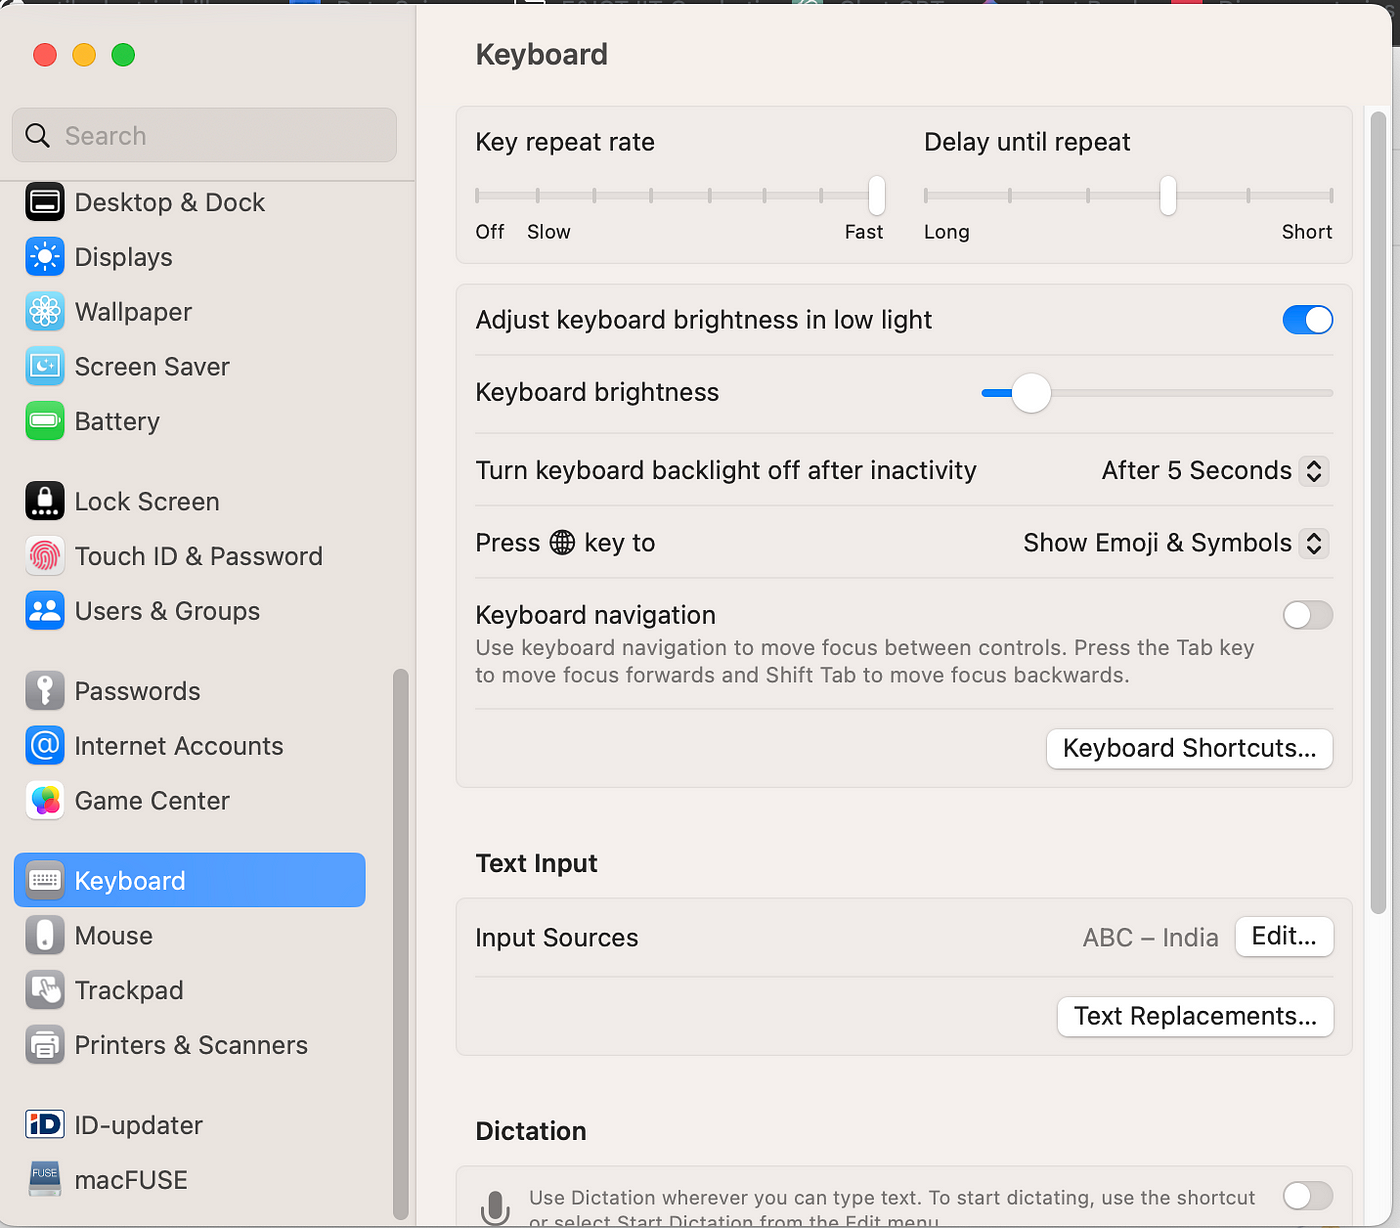
Open the System Settings and go to Keyboard from the left pen and then click on Keyboard Shortcuts on the right pen
It will take you to the new windows and then select Services from the left tab. Check the right-side General option. You can see your newly created Toggle Resolution option below it. Double click it to set the keyboard shortcut as you prefer.
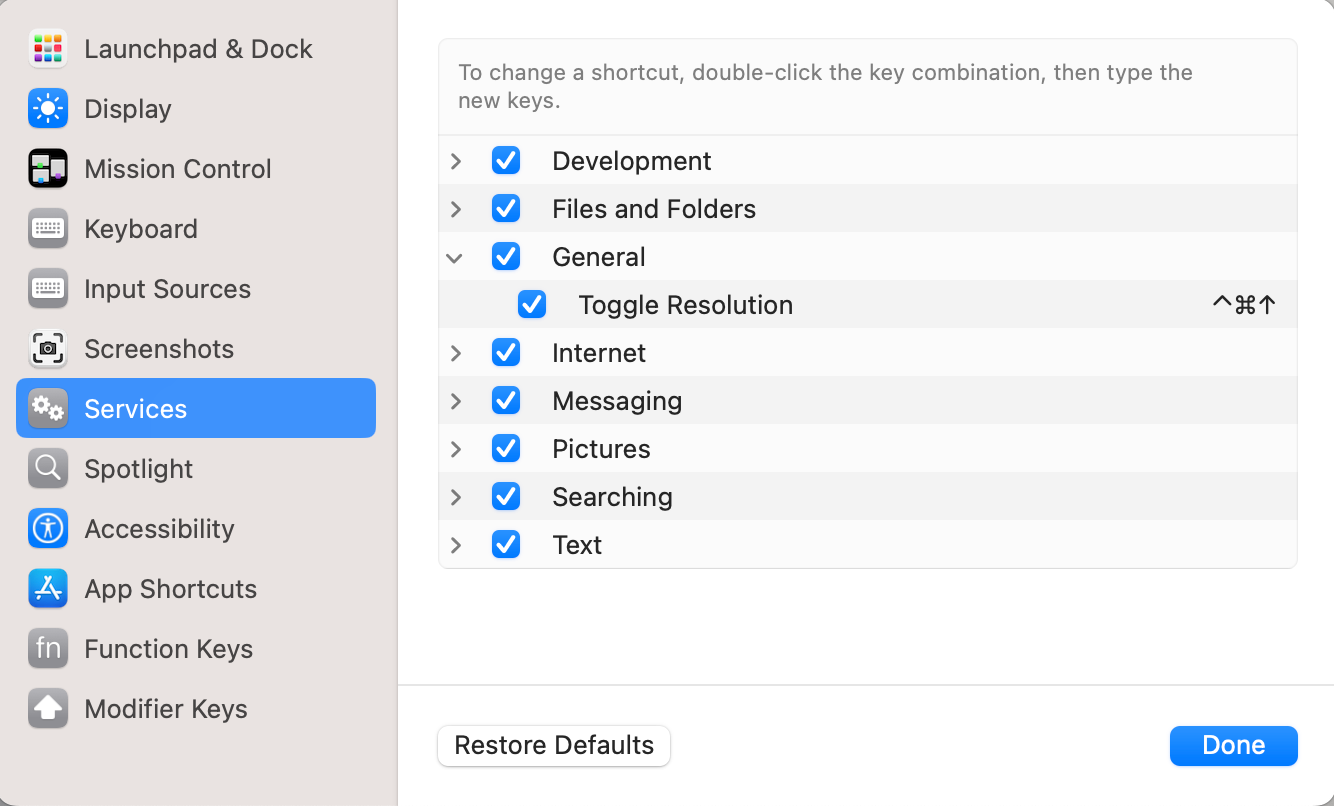
As you can see I have selected ctrl + cmd + up arrow for this task.

Then restart your system. Later it may ask for some accessibility security response you can give the permission from settings.

Now it will work by your keyboard shortcuts with toggle. Thank you.
UTM setup for MAC Microprocessor

 Hope you have already installed your required software from IT team [eg. Vinit]. He has mainly installed the following software:

  • Python 3.8
  • Docker
  • VSCode
  • Sublime Text
  • Anaconda including navigator
  • Chrome
  • MS Edge
  • draw.io
  • Acrobat reader [original]
  • Itsycal [for notification from our office 365 calendar and more]
  • Postman
  • Mongodb Compass [community version]
  • DBbrowser for sqllite
  • balenaEtcher
  • OpenVpn connect [to connect to our office.vpn to work and connect to our remote team]
  • XCTU [to configure xBee module if needed]
  • Microsoft Teams
  • LibreOffice

After several R&D found that UTM | Virtual machines for Mac (getutm.app) can solve our problem. Before that I have tried with lima-vm/lima: Linux virtual machines, typically on macOS, for running containerd (github.com) which not helped out the problem with Docker Desktop run on MAC especially on our M1 MAC which can’t detect our xBee module USB port. M1 MAC host do not share the USB port with guest system [Docker container]. Also then we needed different VM for windows as well eg. Parallels [not free].

UTM does solve both windows and ubuntu can run with USB port sharing inside the container.

Remember:

  • Size of the disk space can’t be change unless delete the VM [eg. Windows] and increase or decrease the size eg. 20 GB to 30 GB etc
  • Windows need to unblock Device Manager by following a You tube link I provided below or you can approach Vinit [IT team]
  • Never close the VM window directly by click on X. Instead shut down the VM properly from OS menu itself first and then can close the window
  • Do not need to keep running UTM all the time. Run only when you require to run any VM OS

How to install UTM in M1 MAC:

  1. Download latest [at least 3.1.5] from UTM | Virtual machines for Mac (getutm.app) or Latest UTM release you can download from:
  2. Releases · utmapp/UTM (github.com)
  3. Open a terminal and run
  4. 1brew install qemu
  5. Install the UTM dmg file by clicking on it
  6. Follow this link to install and configure UTM for Ubuntu 20.04 Ubuntu 20.04 | UTM (getutm.app)
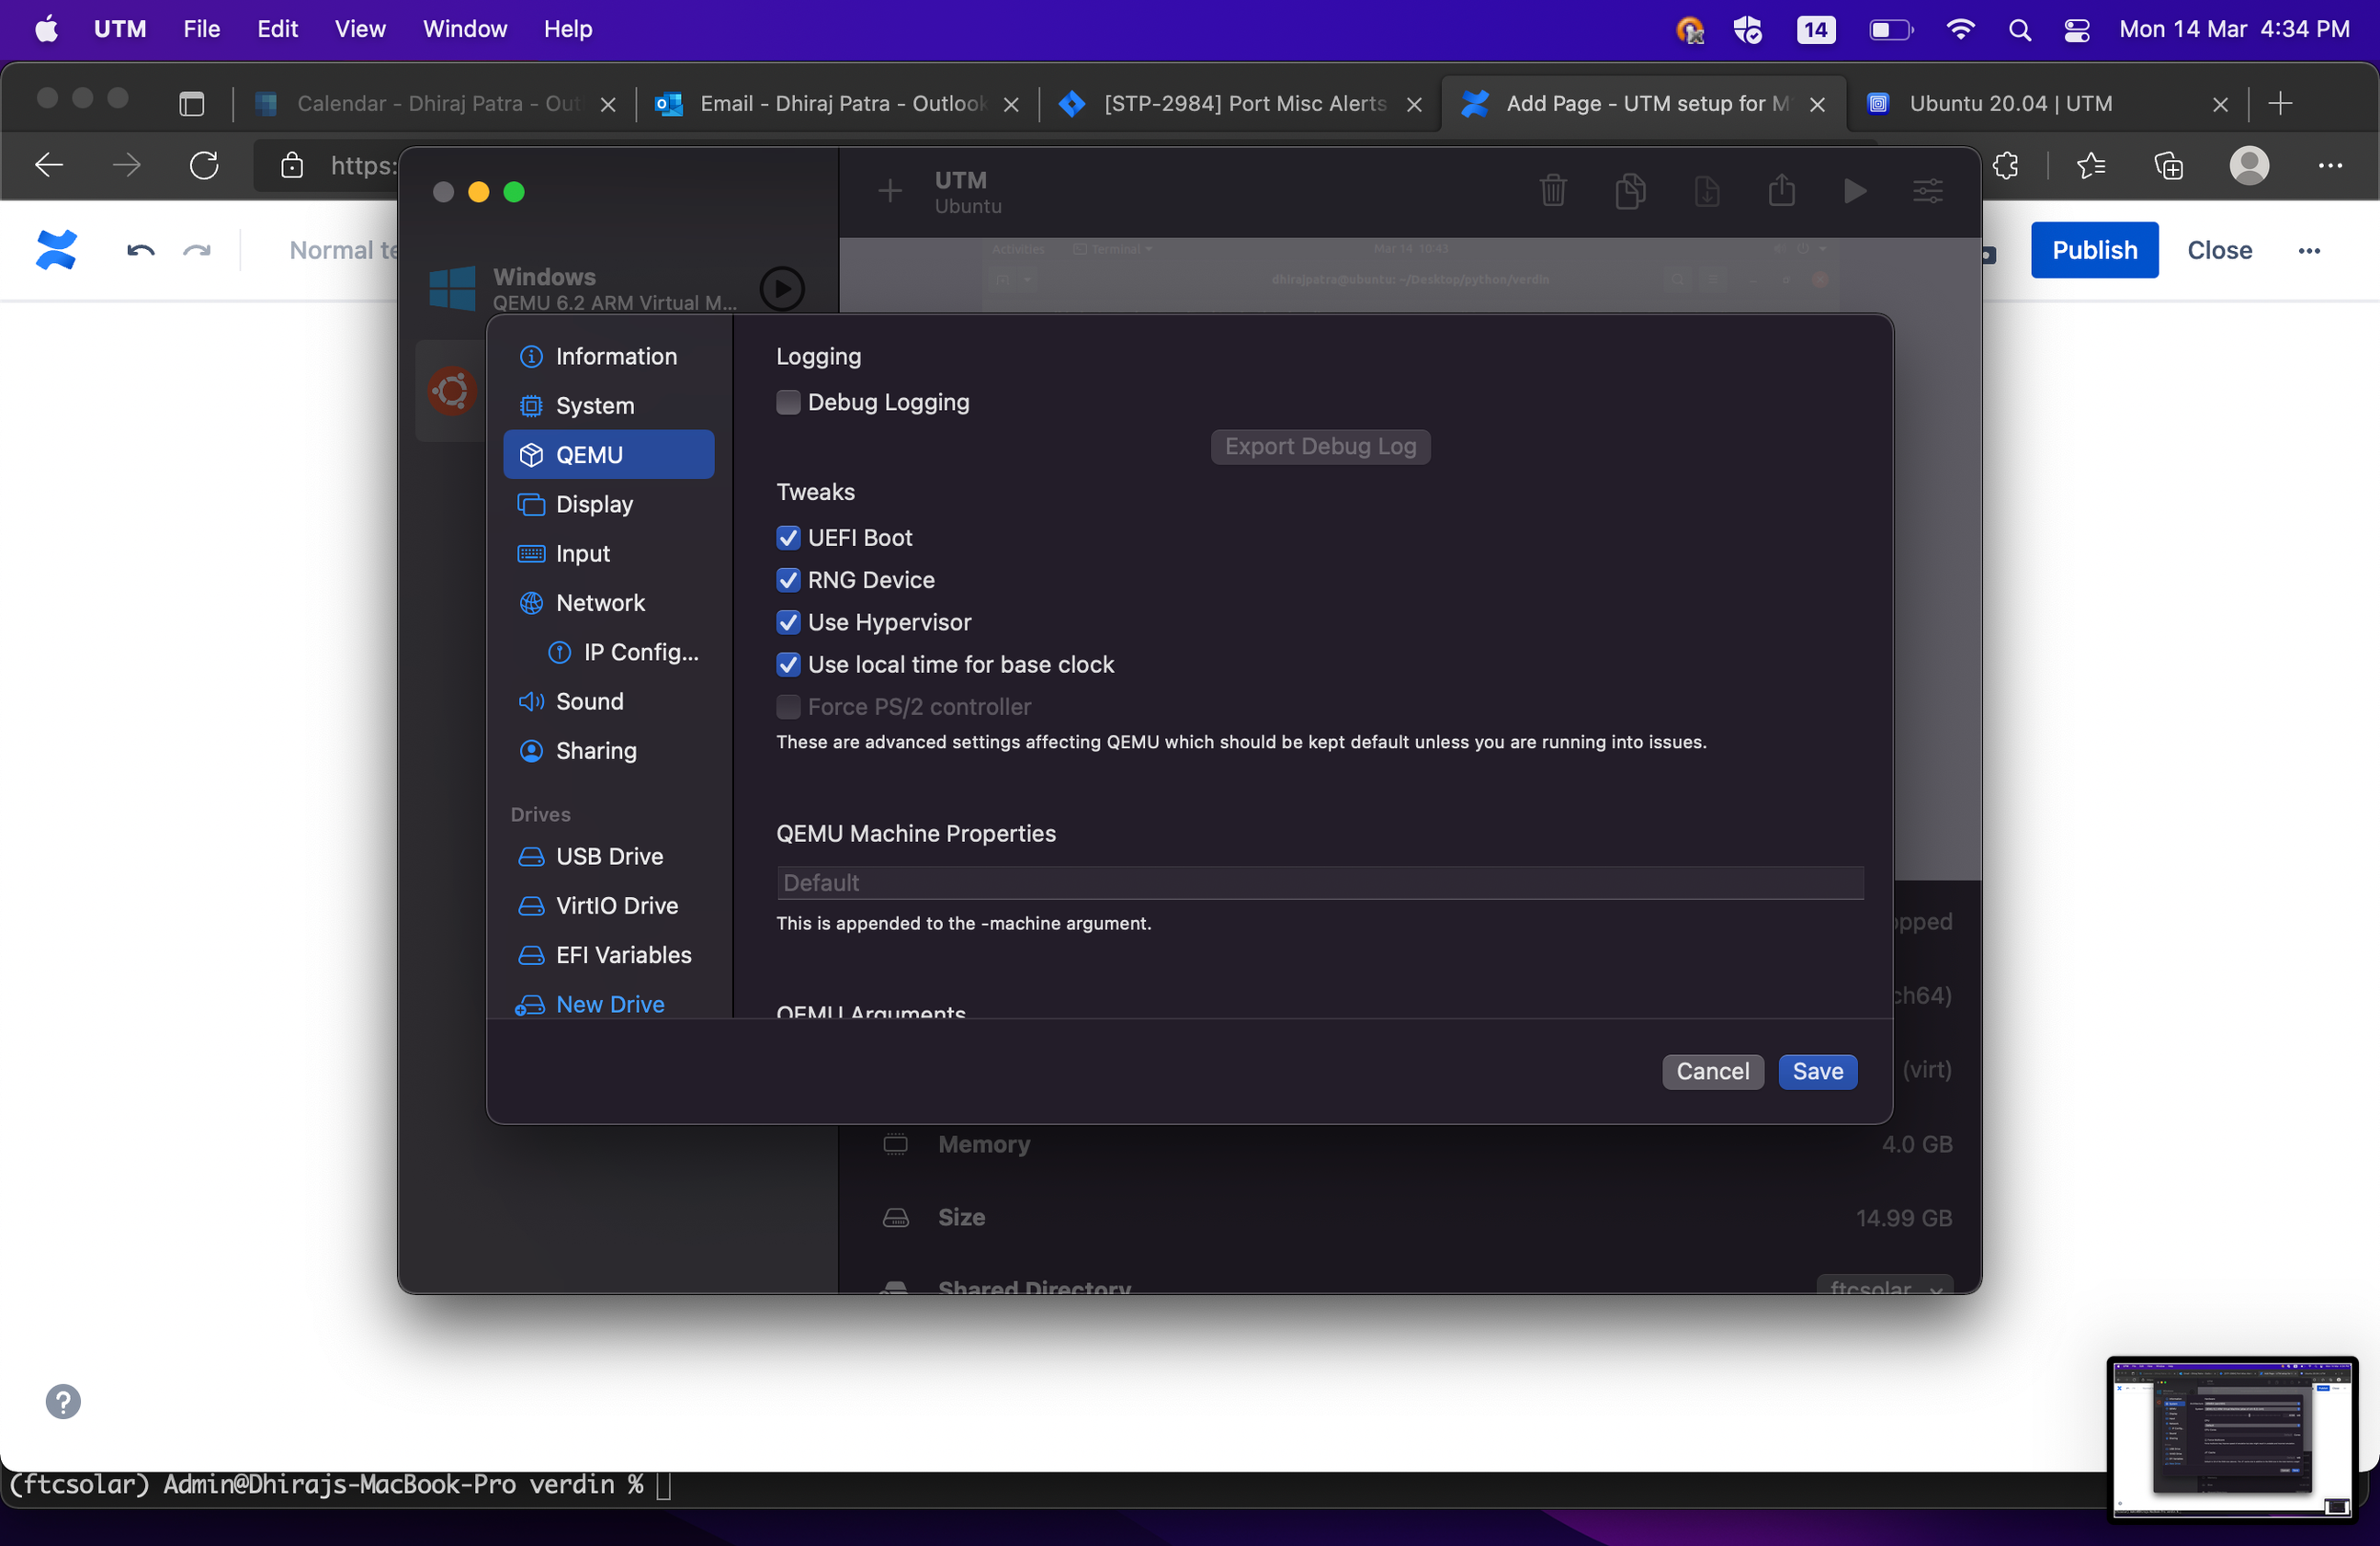
  7. but settings on UTM must be following
  8. need at least 64 GB space for Ubuntu guest [as we will be using Docker 20–30GB fails]
  1. Keep patient it can goes error or take some time around 10–20 min max to boot up if everything fine. Otherwise restart again and when it is calling rebooting just hold the shift key.
  2. Then terminal login with your username and password you have given when installing.
  3. Run the following commands from the above links to install Desktop and sharing lib
  4. After run all the commands for desktop you can login inside it
  5. To get the share folder inside the guest [Ubuntu] you may need to run this command
  6. sudo apt update
  7. sudo apt install ubuntu-desktop
  8. sudo reboot
  9. sudo apt install davfs2
  10. sudo systemctl start spice-webdavd.service
  11. sudo mount -t davfs -o noexec http://127.0.0.1:9843/ <your_mnt_folder>
  12. Click on USB icon need to click the USB device you attached to your host to get inside guest. For me it is USB connector for hat with xBee module.
  1. Now open a terminal and install
  2. sudo apt-get install docker-compose
  3. First time you may need the UI folder in your shared folder
  4. Now you are ready to get the git pull of our application and then run docker-compose to run the application

Similar way you can install Windows 10 home edition,. Before start installing kindly take the lic key for it from our IT team. Windows installation very straight forward.

Follow this link How to Install Windows 10 in UTM (M1 Mac) — YouTube or Windows 10/11 | UTM (getutm.app)

  • Setup 20 GB space is more than enough
  • connect USB drive and activate from VM top right panel
  • Copy paste the folder containing [spice guest tool from above utm link, Mission Control application zip, USB to URT bridge driver zip] into desktop
  • extract the zip folders inside that folder
  • You need to unblock the Device Manager [Vinit from IT team helped me,

Handling Large Binary Data with Azure Synapse

  Photo by Gül Işık Handling large binary data in Azure Synapse When dealing with large binary data types like geography or image data in Az...